DEC Macintosh Connection
A DEC, with file sharing enabled, exports its file
systems as shared PC volumes. So a Macintosh that
can connect to PC volumes can connect to the DEC
file system.
You'll need to make sure your DEC has file sharing enabled. On
the DEC, go into Settings->Network settings->Advanced network settings
to see if File Sharing is Enabled or Disabled. If it
is Disabled, you'll need to Modify advanced settings
and enable it.
You'll also need to know the DEC's IP address before continuing.
It should be displayed under Settings->Network settings on
the DEC.
Mac OS 9
Macintosh operating systems before OS X don't natively have
the ability to connect to PC volumes. But various software
clients are available that do allow Macintosh computers to
connect to PC volumes. Some of these are:
- DAVE
by Thursby Software Systems
- MacSOHO
by Thursby Software Systems
Here is one way to connect, using DAVE.
- Run the DAVE application.
 It can usually be found under the Apple menu.
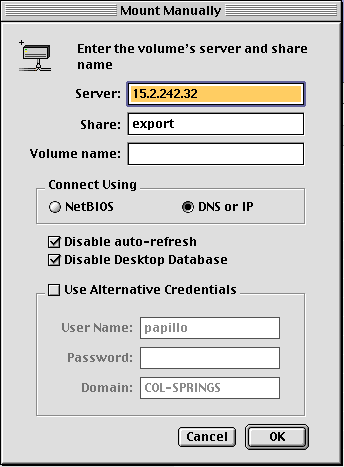
- Select Mount Manually... from the Access menu.

- The Mount Manually dialog box should appear. Here is one
example of how to configure it. The Server should be set to
the IP address of your DEC, and the Share can be export
or import:

- Click OK. An appropriately-named disc with a
DAVE icon
 should appear on your desktop.
- Double-click the disc icon; the contents should appear. Be
patient; it can take a minute or two for the Mac to collect all the
directory information over the network, especially if the DEC has
a lot of files.
Mac OS X
Mac OS X is UNIX-based with a built-in Samba client.
- In the Finder, select the Go menu and choose
Connect to Server (or hit Command-K).
- The Connect to Server dialog box will appear. In the
field labeled Address, enter:
smb://workgroup;user@De100ced0566/export
Replace the Windows name De100ced0566 with the Windows name of your DEC. If you're looking for the DEC's import directory,
you can replace the export share name with import.
- Then click the Connect button.
- The SMB/CIFS Filesystem Authentication window should appear,
prompting you for a password. You should be able to just click OK.
- A disc icon on the desktop should appear.


