
HP Media Vault
Frequently Asked Questions
and Knowledge Base
|
|
 |
| Generation 1 (MV1) | Generation 2 (MV2) |
| mv2010, mv2020, mv2040 | mv2120, mv5020, mv5140, mv5150 |
| Comparison of Generation 1 and Generation 2 products | |
HP Media Vault FAQ TOPICS:
 This symbol means the link opens a new page
- About this FAQ
- About the HP Media Vault series
- Adding capacity to your MV1 media vault
- Adding new software to the Media Vault (MV1)
- Backing up the Media Vault/Offsite Storage (MV1)
- Backup Software, changing destination
- Clearing System Drive on the MV1
- Data Recovery for the Media Vault
- Dead MV1 troubleshooting
- Defragmentation, why it's not needed
- Disk layout specifications for the MV1
- DLNA Media Streaming
- Drive Backup scheduler MV1 or MV2 pro
- Excessive Disk Activity on the MV1
- Experimenting with the MediaVault
- Factory configuration of Shares for the MV1
- Fan noise, excessive noise on the MV1
- FAT, NTFS and ReiserFS file systems for the MV1
- Files that cannot be deleted
- Finding the HP Media Vault on your network
- Firmware
- Firefly/iTunes server
- Firefox black box issue on MV2
- FTP Server on the MV1
- Hacking, IPKG, and Debian
- Hacking the MV2 (by Chris S.)
- Hard Drive Replacement (MV1)
- Hard Drive Replacement (MV2)
- Hard Reset instructions and purpose
- Hardware, Internal Photos of the MV1
- HowTo Build Extra
Utilities for the MV1
- HP.com MV2 troubleshooting page
- Macintosh,
how to automount the Media Vault
- Manuals/Support Documentation for MV1/MV2
- Maximum addressable limit of Media Vault 1/2 (1.2 and 2 TB limit)
- MediaSmart Server Forum
- Media Vault Generation 1 vs. Generation 2 comparison
- Mirroring Tips for the MV1
- Mounting a Media Vault Drive on a Linux System
- Nasload Utility for loading MV1 OS on to Hard Drive
- NFS/SMB mounting on Linux for the MV1
- NTP time servers on the MV1
- Open Source/GPL components
- Overclocking the MV1
- Password Problems on Shares
- PC Restore CD
- Power Consumption
- Power Switch Behavior of the MV1
- Power Supply Replacement
- Product Reviews
- Printer Sharing for the MV1
- Remote file sharing for the MV1
- Remote power down of the MV2
- Resetting administrator password and factory defaults
- Resizing and Mirroring existing volumes on the MV1
- Running out of disk space on MV2 while there is still more available
- Screen Shots of the MV1 User
Interface and Help Screens
- Serial Console
- Setting/Resetting the administrator password
- Software/Backup Utilities
- Startup.sh script for the MV1
- Telnet/SSH (root access)
- Time Machine, configuring Mac OS X with the Media Vault
- Twonky Media Server Installation on the MV1
- Unmounted Volume on the MV1
- USB drives, copying files to or from the MV1
- User Support Groups for the Media Vault on Yahoo
- User mode vs. Workgroup Mode on the MV1
- Using
the MV2 as a general purpose web server
- Using
the MV2 as a general purpose database server
- Using
the MV2 as a Jetty server for Java Servlets
- Prequequisites
for the implementing the servers mentioned above
- Vista Issues on the MV1
- Web Browsing Mode on the MV1
- Where to buy one?
- Windows 10 SMBv1 issues
- Windows Media Player 11 issues
- Xbox 360/PlayStation 3 compatibility
This FAQ/Knowledgebase is operated by Lee Devlin and is not officially sponsored by the Hewlett-Packard Company. I set it up to work in conjunction with an on-line user group community of HP Media Vault owners and enthusiasts to help solve problems and share information. I was the Systems Architect at HP for HP Media Vault as well as the HP de100c Digital Entertainment Center and HP DVD Movie Writer, products for which I also maintain FAQs. I left HP in May, 2007 after working there for 24 years and I am now an Engineering Consultant. If you want to know more about me, you can view my profile on LinkedIn. If you want to contact me, my contact informationcan be found here.
The HP Media Vault is a network-attached storage device for the home and small business. The Generation 1 Media Vaults were available in three versions, the model mv2010 with an internal 300GB drive, the model mv2020 with an internal 500 GB drive, and the model 2040 that includes two 500GB drives. The mv2010 and mv2020 models have an empty slide-out tray which will accept a standard 3.5" SATA drive for expansion or mirroring. This second drive can be configured as a mirror of the first drive, as additional storage, or a as combination of both. The Generation 2 Media Vaults have 3 models. The mv2120 has a single 500 GB drive and an empty slot for adding a second drive. The mv5140 has a pair of 500 GB drives and mv5150 has a pair of 750 GB drives. The mv5020 which was introduced in September, 2008 is a European version of the mv2120.
The HP Media Vault comes with two backup separate applications. One backup application called NTI Shadow performs continuous or regularly scheduled backups of selected folders. It can be configured to store multiple revisions of files that can be viewed directly with the Windows Explorer in the event of accidental deletion or inadvertent damage to a file on the PC. There is a front-end to this program called HP Easy Backup that simplifies the process of getting NTI Shadow set up for new users. This application launches during the installation procedure and offers to configure the My Documents folder and associated subdirectories for continuous backups. A user can switch back and forth between this simplified interface or the more flexible (but slightly more complicated) NTI Shadow interface. NTI Shadow is accessed from the control panel under the option 'Backup your important files'.
The other backup application called NTI Drive Backup is intended to make a complete 'image backup' of the client PC's hard drive so that it can be completely restored should the computer's hard drive fail. There is a special boot WinPE CD called the PC Restore CD included to allow the PC to boot from the CD/DVD drive with a new blank hard drive and subsequently pull the image back over the network from the media vault. This allows the user to get a computer back up and running in minimum time when a hard drive failure occurs. NTI Drive Backup is accessed from the control panel under the option 'Backup your entire hard drive'. On the Generation 2 products, the NTI Drive Backup software is only included with the Media Vault Pro models (i.e., the 51xx series)
So to summarize the differences of each backup program:
The HP Media Vault (MV1) also contains FTP, HTTP, CIFS, and NFS servers for maximum flexibility in sharing files. It is easy to share files among Windows, Mac, and Linux clients. In addition to these servers, there is also a media server based on the DLNA standard to share photos, music, and videos with devices that can play them on the TV. The MV2 doesn't include FTP or NFS servers.
Adding capacity to your HP Media Vault
This section applies to the MV1 products. To add a new SATA drive to a media vault please refer to the procedures given in the on-line manual linked under the Help & Support tab of the control panel. There is also a pamphlet taped to the inside the mobile rack insert along with the mounting screws that shows how to install the drive. Before you add more storage, you should consider how you wish to configure the storage, that is, as an extension to an existing volume, as a new volume, as a mirror to an existing volume, or as a combination of these. There are good reasons for all these various configurations. For example, if the primary purpose of your HP Media Vault is to hold data that is already stored somewhere else, you may not want to use mirroring, which by definition requires twice the raw capacity of the disk storage to hold a given amount of data. You may have a portion of your data, for example, your digital photos, that are very important but only consume 10% of your total storage requirements and so you would like store them on a mirrored drive, but don't need all of the capacity mirrored. If so, you could mirror 10% of each hard drive and create a mirrored volume specifically to store your photos. Then the rest can be allocated to separate volumes that are configured as concatenated storage (i.e., a volume that spans multiple disks) or as regular volumes that do not span disks. A word of caution is in order here. If you span multiple disks with a single volume, your data will be lost if even one of the hard drives in the volume fails. You shouldn't use spanned volumes unless you have all the data backed up elsewhere or it can otherwise easily be recovered from other sources. The method for creating a spanned disk is mentioned in the last paragraph of this section.
If you want to make a partial mirror you'll have to first resize Volume1, because by default it takes up all of the System drive. Then you can mirror it (or any another Volume you create on the System drive) to unallocated space on the mobile rack drive. The first mirroring operation can take a long time, because it needs to copy all the blocks from a volume on one disk (even those blocks with no data on them) to the other drive and this takes place at about 40 GB/hr although there are ways to speed it up. While it's doing this, the Media Vault will still be usable, with slightly reduced performance, and you can check the mirroring progress if you go to the Disk Settings page and refresh it occasionally. The latest firmware (1.2.5.6) has a bug in it where it uses minutes and seconds instead of hours and minutes when computing the time left to complete the mirror. So if it tells you that 5 minutes and 10 seconds are remaining, it means you have 5 hours and 10 minutes. This will be corrected in the firmware 1.3.5.9.
When installing the drive in the mobile rack, you need to put it far back as possible in the tray (away from the tray handle). The mounting holes are slotted and so make sure it's back as far as as it can go before tightening the screws. If you have it too far back, the handle will be difficult to close, but if it's not back far enough, the handle will not feel like there's any resistance when you close it. You can adjust it farther forward if the handle won't close without too much resistance. The handle has a cam that helps push the drive back to engage the connectors. A drive that is making intermittent contact can cause all kinds of problems, such as continually rebuilding of a mirror as it may disconnect and re-connect periodically, or it could cause the media vault to hang or continually reboot.
I should mention here that a mirrored drive is NOT a substitute for a proper backup. It can only protect you from one mode of failure, namely, a hard drive failure inside the Media Vault. There are many other ways to lose data, so do not rely on a mirror as your only 'backup' because if you get some kind of malicious virus, a lightning strike, or your Media Vault is dropped off a table, you can lose data on BOTH drives and thus lose everything.
To create a Volume that spans multiple drives, also called a 'concatenated' or spanned volume, you need to have unallocated space (marked in red on disk bar graphs on the Disk Settings page) on the drive on to which you want to span the volume. Unlike mirroring or simple volumes, a spanned volume cannot be created on a completely blank disk. If you want to span a volume across an entire disk that has not been formatted in the Media Vault, you will need to first create a simple volume on it of any size, and then delete that volume. Then that disk will be available as a selection whether you wish to create a new spanned volume or if you want to modify an existing volume to span on to that drive. The clue that a disk with 100% unallocated space is formatted is that it will have a name like 'Disk1' instead of 'Blank Disk 1'. Do not use the 'erase disk' button to remove the volume because that will make it blank again and you'll be back to where you started. The 'format' button is a quick way to set up a simple volume on blank disk. So if you use that button to create the volume, you will still need to delete the volume you created so that the disk will remain formatted, yet have unallocated space on it. Please be aware that if you're resizing an existing volume that it can take a long time, up to an hour or more, as explained in this section of this FAQ. You will need to let it finish.
An common question on the Media Vault Yahoo Group is for the exact manufacturer/model number to order when adding a second drive. These model numbers change almost monthly for each manufacturer so it's impossible to specify a model number that won't be replaced by a new one in a very short time. In theory, any SATA drive will work. It doesn't need to have exactly the same capacity or model of the installed drive, since you can mirror any portion of a drive and the excess capacity left over can be configured as a simple volume.
Backing up the Media Vault/Offsite storage
This section applies primarily to the MV1 products. One of the most frequently asked questions about the Media Vault is whether a mirrored drive can be removed and rotated with another mirrored drive and stored off-site to safeguard against data loss from causes like fire, flood, or theft. The mirroring function is designed to protect against a drive failure and was not designed to enable off-site backup. Part of the problem is that when an old mirror is re-introduced, it could be for the purpose of retrieving missing files, but the system wouldn't know how to handle this because the mirroring function would attempt to overwrite it with newer versions of the files. In addition, mirroring works at a very low level and copies block-by-block without regard for the file system. This is why it takes many hours to reconstruct a mirror when a drive is re-introduced. It mirrors at about 40GB/hour and this can take a long time if you have a large mirrored volume. Any drive that has been missing will trigger the MV to rebuild it from scratch.
If you wish to have a backup for off-site storage you could use your PC to pull data off the Media Vault using the NTI Shadow backup application and send the data to a USB drive. You have to add a file to the PC in order to make it show up as a destination as explained the this section of the FAQ. Using a USB drive that is formatted by a PC is also better for data portability because it can be connected to any PC and have the files available for recovery should it become necessary. If you only had a mirrored drive from a Media Vault and the Media Vault itself was destroyed, you'd only be able to retrieve it on another Media Vault.
Create another Shadow Backup job to backup your Media Vault to the USB drive that you want to take offsite. It will only store the files that have changed since the last backup, so after the first backup is finished, the incremental periodic backups will take much less time.
If you really want to use the mobile rack drive to rotate it with an off-site backup drive, here is a way to do that:
Purchase two similar hard drives and another mobile rack tray. You can find the mobile rack tray at places like NewEgg.com. The manufacturer/part number for the mobile rack's internal tray is KINGWIN KF-91-T-BK. The most recent price at Newegg is $12. Now you'll have two hard drive/tray assemblies. When you format these drives, do not set them up as a mirrors of the internal drive, but rather as a separate volumes using the same name for the Volume and the Share you put on these drives. I would suggest something like a volume name such as Volume2 with a share name such as Backup2. Think of them as a matched set. Schedule an NTI Shadow job to perform a complete backup to the drive in the mobile rack to run on a regular schedule. When you wish to rotate the off-site drives, you can go into the web interface under Disk Settings and select the 'safely disconnect disk' to remove the drive and then simply insert the matched off-site drive. Make sure to use a padded bag or similar means to transport the drives. You should do this on a regular schedule so that the off-site backup will have current data on it.
I've also had customer requests for the P/N for the whole receiver/tray to install a mobile rack drive into a PC in the event the Media Vault died. That requires not just the tray, but a whole receiver/tray assembly. That P/N is Kingwin KF-91-BK and the cost is around $25. If you want to read the files on a PC, you'll also need to format that drive as a FAT32 drive when you set it up. Please note that FAT32 drives have a maximum file size limit of 4GB. They also should not be larger than 100GB on and MV1 due to a bug on the MV1 when writing to large FAT32 drives where the file lengths start to go to zero length.
For MV2 products, there is a feature that allows a backup to a USB drive through the web interface but it has been reported to be so inconvenient and unreliable that it's probably not worth pursuing. Instead, it would be better to mount the USB drive to the PC and back it up that way.
Backup Software, changing destination
The NTI Shadow Backup software that comes with the HP Media Vault has a special feature that makes it easy to locate HP Media Vaults on the network. To make the setup dialog simple, this feature restricts the location of your backup destination to HP Media Vault(s) on your network. However, if you need to redirect your backup to another location, you can do so with the following procedure:
Create a file in C:\WINDOWS\system32\drivers\etc called hpmvhosts using Notepad or similar text editor. If Notepad adds an extension to the file such as .txt, use the rename command to remove it. Insert a line in the file with the location name and IP address separated by a single <tab> character. Your PC's network name can be found in the device manager under the computer name tab. If the desired destination is located on a PC on your network, you will need to enable the destination for network sharing. This is easily done by right-clicking on the folder name and following the steps to make the folder sharable on the network. The contents of the hpmvhosts file should look like this:
home_pc_name 192.169.1.10
Please substitute the actual names and IP addresses of the backup destination PC or network locations.
After creating this file and rebooting the PC, double click on the MV icon in the systray to launch the control center and select the menu item 'Start Browsing your HP Media Vault'. You should see your HP Media Vault and the new location that you created in the hpmvhosts file. Now when you select "Backup your Important Files", you will be able to select this destination as the location for the backup.
It has been noted that on some systems, after you've set the PC as a backup destination, you may get periodic messages that a firmware update is available even though it is not. The latest firmware is 1.3.5.9. You can ignore these messages.
The procedure for creating an alternate destination is intended to use other computers as the backup destination(i.e., not the PC that is being backed up). A destination PC need to be shared on the network. It's not a good idea to use this technique with NTI's image backup (NTI Drive Backup) software because if you need to restore an image using the PC Restore CD, it will not have an entry in hpmvhosts and thus will not be able to find and restore the backup. It will only be able to find HP Media Vaults.
Data Recovery for the Media Vault
If you've tried all the troubleshooting in this FAQ and have come to the conclusion that your Media Vault's motherboard is dead and you need to recover data from the drive(s), there is a Windows data recovery program for the MV1 available from CNW Recovery. This program is free to download in 'demo' mode and if you are able to see your files, the odds are pretty good you can recover them. The demo version of the program won't allow you to write the files to another drive. For that you need a licensed copy. A 30-day licence costs $19.99 and a permanent license costs $34.99 for individual users. It would be best to have a SATA-to-USB adapter to use this program to make it easier to connect the drive you remove from the Media Vault directly to your PC. They are available on line from many sources for about $15.
The MV2 used a different format, which is standard to Linux, but is based on the Logical Volume Manager (LVM). The only way to recover data from MV2 drives is to mount them to a Linux system. Because of the LVM, you need to follow a special procedure as explained starting in the second parapgraph in this section of the FAQ.
Dead MV1 troubleshooting
A 'dead' MV1 may either be completely unresponsive or just the front panel button comes on but nothing else happens when you try to power it up. If the front panel button comes on and it appears to start powering up, but the front panel OK light never illuminates and you have to unplug it to get the power button light to go off, then here is a list of things to try for troubleshooting:
1. If there is no sign of life at all when you plug it in and push the power button, then you may have a bad power supply. To check for this, see if the green LED on the back of the power supply is lit. If not, either you do not have it plugged into a live outlet or the power supply is really dead. The power supply is not a standard ATX supply. It's physically smaller and has a non-standard mini plug. Its pinout is the same as the ATX standard, if you know how to test for voltages on an ATX power supply, then you can employ the same technique on the MV1's power supply to confirm whether it's working or not. The best way to get a new one would be to scavenge one from another MV1 (possibly one that has a failed motherboard or hard drive, for instance.) or from a HP slimline PC in the a7600y family. The MV1's power supply was leveraged from that product line.
2. If the blue light behind the power button comes on when you press it, but no other front panel LED lights up, or they light up just temporarily, then you have one of three issues:
a. There is a corrupted NVRAM variable that is preventing the Linux OS from booting. Use the hard reset and see if that fixes it. If not then go to the next step.
b. The operating system (OS) may be corrupted or the
hard drive has gone bad. If the OS is corrupted, when the Linux system
is trying to boot, it gets stuck. To check if this is the problem, open
the unit and disconnect the SATA cable to the internal drive. This
will allow it to boot up into the CFE (a type of BIOS) but no further. The
CFE does have the ability to get a DHCP address and if it does, it will
illuminate the network light. This is what the network LED looks
like ->
![]() . At this
stage, the unit will respond to the 'ping' command only. You can test this
if you remember the MV's IP address (it usually a router continues to assign it
the same one) or you may look at your router's DHCP table to find the IP
address. In a DOS window on a PC, type "ping 192.168.1.101" and see if it
responds. (substitute the actual IP address or your MV1, of course).
If it responds, then the power supply and motherboard are probably OK.
Then the
best course of action, if you have to recover data, would be to get a fresh SATA drive and
install it in place of the original drive and then use Nasload to put the OS on it. If the corruption is limited to
the original drive's OS partition and did not affect the data partition, you should be able to put
the original drive in the mobile rack and recover its data. Of course, if
the hard drive has gone bad, then you won't be able to recover its data.
If you had a mirror, then you should be able to get the data back from that
drive.
. At this
stage, the unit will respond to the 'ping' command only. You can test this
if you remember the MV's IP address (it usually a router continues to assign it
the same one) or you may look at your router's DHCP table to find the IP
address. In a DOS window on a PC, type "ping 192.168.1.101" and see if it
responds. (substitute the actual IP address or your MV1, of course).
If it responds, then the power supply and motherboard are probably OK.
Then the
best course of action, if you have to recover data, would be to get a fresh SATA drive and
install it in place of the original drive and then use Nasload to put the OS on it. If the corruption is limited to
the original drive's OS partition and did not affect the data partition, you should be able to put
the original drive in the mobile rack and recover its data. Of course, if
the hard drive has gone bad, then you won't be able to recover its data.
If you had a mirror, then you should be able to get the data back from that
drive.
If the drive has no data on it that you need to preserve, you can always try removing it and formatting it on a PC. Anything other than its native format will make it appear blank when you use Nasload.
c. If a. or b. don't fix the problem, then it's possible that the motherboard has gone bad. One user reported that simply removing the motherboard's battery for a few minutes and reinstalling it fixed a motherboard so you may wish to try that. If it doesn't work, then the only solution for a failed motherboard is to find another one, possibly on eBay or on the Media Vault Yahoo Group. If all you're worried about is the data on the drive, you can try the Window's based data recovery utility from CNW or, if you're skilled at Linux, there is a technique that utilizes a Linux system to pull the data, but be forewarned, it requires above average Linux skills and it's not as easy as recovering the data on a working MV1. Also, please avoid the use of any PC data recovery tools other than CNW's utility on the MV1 drive. Its format is not standard and so there are no other commercial data recovery tools known to work with it.
Defragmentation, why it's not needed
There is no defragmentation function for the Media Vault. Fragmentation is the splitting up of files across the disk surface that causes the head to have to spend excessive amounts of time seeking to read or write files. It slows down system performance and can be a problem on PCs. Linux file systems are not affected by fragmentation issues that are experienced with FAT and NTFS Windows file systems, hence there are no defragmentation tools available for modern Linux file systems. The only Linux defragmentation tools that did exist for earlier non-journaling file systems such as ext2 required the partition to be unmounted during defragmentation, which isn't very practical because it means the data is unavailable at the time. The general advice for getting the best file system performance is not to fill up the partitions (i.e., the Volumes) beyond 90% of their capacity.
One of the most exciting features of the HP Media Vault is its ability to stream media directly to an entertainment system through a Digital Media Adapter (DMA). The HP Media Vault uses a Universal Plug and Play AV protocol adopted by the Digital Living Network Alliance (DLNA) that will allow you to enjoy your photos, music, and videos directly on your TV/Stereo through a device that receives the media from the DLNA server on the HP MediaVault. There are many devices on the market from companies like D-Link, Netgear, Buffalo Technology, Sony, Roku, and Philips that will work with the HP Media Vault. Here is a partial list of devices that have been tested and are known to work:
- D-Link DSM120
- D-Link DSM320
- D-Link DSM510
- D-Link DSM520 (only compatible with DSM-520 version 1.01 firmware. Click here to learn how to roll back your DSM-520 firmware)
- Roku Soundbridge models M500, M1000, M1001
- Netgear MP-101
- Netgear Entertainer EVA700
- Buffalo Technology Link Theater PC-P1LAN
- HP MediaSmart TVs
- X280N MediaSmart Connect
- New User-Contributed List
If you don't see your device in that list, you might consider asking on the Media Vault's Yahoo Group if anyone has tried it with the MV1 or MV2. Gaming devices like the Xbox360 and PS3 are covered in a different section of this FAQ.
The media vault’s DLNA media server supports the playback of the following file types:
Video:
.mpg | .wmv | .mp4 | .avi | .asf | .mov | .vob | .mpe | .ts | .dvr-ms | .m2v | .mpeg | .m2p | .divx | .xvid | .m1v | .m4vMusic:
.mp3 | .ogg | .wav | .lpcm | .pcm | .wma | .mp2 | .ac3 | .m4a | .aac | .mpa | .mp1| .aifPhoto:
.jpg | .jpeg | .png | .tif | .tiff | .bmp | .gifIn the case of the file types shown above, only the metadata (Artist, Album, etc.) from .mp3 files is indexed. The other file types are only managed by their file and folder names.
I should mention that when these digital media adapters work, they are wonderful, but there have been a few cases when some people cannot make them work reliably despite their best efforts. Many problems can be traced back to use the wireless network feature, which can be a challenge especially when there is signal loss due to obstructions between the device and the wireless access point. If you can figure out a way to use a wired Ethernet connection, your chances of success are considerably better. As this product category matures, it will become easier for non-experts to get them set up and working. But if you're a tinkerer, they are a lot of fun to use. You will likely have several of them around the house eventually so you can begin your collection right now and accumulate more as they improve.
DLNA streaming is enabled by default for files in the MediaShare folder on the MV1 series. On the MV2, there are additional folders called Music, Videos, and Photos that are enabled for media streaming by default. You can enable media streaming through the web interface for any folder. The MV1's Media Streaming function will not work if the Volume name has spaces in it. This is a bug, since spaces are allowed in Volume names, but in general, it's best to keep Volume names short (11 characters or less) and avoid the use of spaces in the Volume name. I would recommend you use the underscore '_' character if you want to have a space between characters in a Volume name.
Sometimes people wonder what they need to do if they want to stream media files to PCs and how the DLNA server comes into play in that case. DLNA was really intended to be used for hardware DMAs that connect to a TV or stereo. The server inside the Media Vault automatically indexes and serves media files to these devices using the DLNA protocol. Part of the protocol is the 'discovery' of servers on the network so you don't have to provide information about the server the DMA You simply use a menu on the DMA device to choose which DLNA server on your network you would like to use. A PC running Vista in combination with Windows Media Player 11 can discover DLNA streaming devices on the network and thus play files from the Media Vault. I am not aware of any other software DMA players that work with the built-in DLNA server in the Media Vault.
There may sometimes be shortcomings of the Media Vault's built-in DLNA server and so some people have decided to add the Firefly/iTunes server, or in some cases the Twonky Vision DLNA server because they have better support for various DMAs. Of course, with a PC, you can simply mount the files on the Media Vault to the PC as a drive letter and nearly any software player such as iTunes or Windows Media Player will be able to index and stream files in that manner so you don't really need to have the DLNA streamer enabled if the only thing you want to do is play files from the Media Vault on a PC.
Drive Backup scheduler
The software that comes with the HP Media Vault includes two different types of backup programs. Both of them are from NTI (NewTech Infosystems) and are customized to work with the HP Media Vault. The first one is called NTI Shadow and is accessed under the 'Backup your important files' menu item from the HP Media Vault control console. Shadow is intended to back up files in a way that they can be examined by using Windows Explorer. You won't need any special software to see the files that it puts on the HP Media Vault. The files will all be stored in the same directory structure that you have them stored on the PC. In addition, you can use it to store multiple revisions of files, so if you inadvertently delete or damage a file, you can get a previous revision from the Media Vault, provided you set it up to keep previous versions of files when you create the backup jobs.
The other program is called NTI Drive Backup and it's intended to backup an entire drive letter at a time to help recover from a hard drive crash. You run it by selecting the menu item on the control console called 'Backup your entire hard drive'. It stores a drive image by combining all the files into a set of 4GB files ending with an extension called .NPF. As it writes the files to the Media Vault, it names the first file with a common backup job name and as each file grows to 4GB, it breaks the file off and appends a suffix after it such as 001, 002, etc. As the files are written, every time a file reaches 4GB, it re-numbers all the previous files by incrementing their suffix by one and will always write the last file with a job name without a number after it. In order to restore this image, you need to run the restore program from the control console, or from the PC Restore CD. If you have a hard drive crash, you will need to use the PC Restore CD to boot the PC and it will find the Media Vault on the network and allow you to choose the image you wish to restore to the blank hard drive.
You can schedule Drive Backup to occur periodically. Since it's likely to take a long time if your drive has a lot of data on it, you probably don't want to do it every day, but perhaps once a week or once a month. That way if you ever have to restore your PC, the backup won't be stale. Then you can use Shadow to restore the rest of the files, since Shadow should be set up to run continuously or at least once a day to backup files that have been changing.
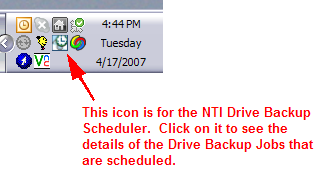
Please make sure to update the Media Vault software to version 2 if you want to run drive backup with the scheduler, because the first generation of the scheduler didn't always run properly. You should check the NPF files to make sure that they are being updated on the schedule you set by checking their time stamps. When you configure Drive Backup to run on a schedule, it creates a job which you can access from an icon in the systray as shown here:
If you double click on the icon shown above, you'll get a screen to appear like that shown here:
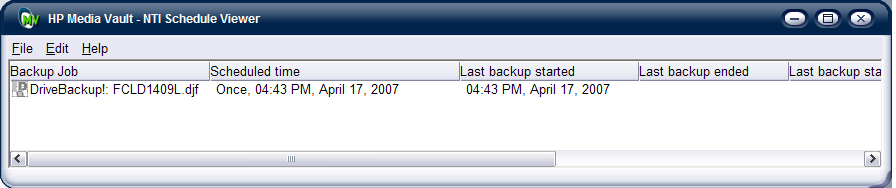
Click on the image for a larger version of it.
From this screen you can see which jobs are scheduled to run and check on their status. You can use this menu to suspend or delete the jobs that have been scheduled. If you want to edit or re-schedule drive backup jobs, you'll need select 'backup my entire hard drive' from the command console to get back into the Drive Backup configuration screen.
There is also a way to explore the image files in the event you want to restore individual files. To do that, navigate to the folder C:\Program Files\NewTech Infosystems\NTI DriveBackup! 4 and double click on the program called DibExplor.exe and you can follow the directions to extract individual NPF files from the archive.
Excessive disk activity on the Media Vault
There have been a few reports of excessive disk activity on the Media Vault (MV1) even when it is not being used. In some cases, the disk activity light is on constantly and the media Vault is either unresponsive or slow to respond. There are several possible causes for disk activity even when the device doesn't appear to be in use. Some of these causes are normal and some are abnormal:
- Media Streaming is attempting to index the media files
- The mirror is being created (or re-created).
- Someone is accessing the device remotely if you have ports forwarded to the Media Vault for HTTP or FTP access.
- A memory leak has occurred and the swap daemon is continuously running
Here is a list of issues you can check:
In the case of Media Streaming, indexing takes place periodically because media files can be added at any time. If you are not using Media Streaming, you should turn it off because building the index causes unnecessary work for the Media Vault. Also, if it never seems to stop, you can check to see if the process mscanner is running continuously by loggin into the Media Vault via telnet and executing 'top' or a 'ps' command. If you are using the Media Streaming function and yet mscanner never seems to finish its indexing, you should use the button to Reset Media Streaming to force it to rebuild the index since if it never finishes it may have a corrupted index.
The mirroring function works at about 40GB/hr and should only occur when you create it, and from that point on all files added will automatically be mirrored. There are a few tips available to speed up the initial mirroring. However, if you remove the mirrored drive and reinstall it, the Media Vault will completely rebuild it because it has no way to know if it had been altered when it was missing. You can monitor the progress of the rebuilding by opening the Disk Settings page and periodically refreshing it to see the % complete. If you see this rebuilding occurring without ever having removed the disk, it may be because the Media Vault had a sudden power interruption or because the drive in the mobile rack is not making good contact with its mating connector. You can check for that by making sure you follow the procedure for adding drives in this section.
If you have ports 21 (FTP) or 80 (HTTP) forwarded to your Media Vault for remote access, as explained in the remote file sharing section, it's possible that someone is attempting to access your Media Vault or downloading files from it. You should password protect your shares if you allow remote file access because there are always people scanning the Internet for open repositories of files to download and that can take up a lot of your bandwidth. Also, if you have the FTP port open to the Media Vault, sometimes a software robot will find it and attempt to guess your passwords. In the case of FTP, this can build up a large log file and a lot of entries in the /tmp folder. This activity will cause the Media Vault to hang or become unresponsive over time. If you want to check for this, you can telnet into the Media Vault and look for files starting with the string "check_user" in the /tmp directory. You'll also see the activity in the FTP log found in /tmp/var/log/vsftpd.log. At this time, you can fix this behavior using a script to periodically clear out the log files as explained in the FTP section of this FAQ.
There is at least one process that has been identified to leak memory, which can deplete the SwapFree and eventually the process kswapd will run continuously and swap memory between the RAM and hard drive. You can confirm this if you telnet in and run 'top' to see if kswapd is jumping up and down in CPU% even though you're not moving any data to or from the Media Vault. To check for depletion of swap memory, you can telnet into the Media Vault and execute the command 'cat /proc/meminfo' and see if the values for SwapTotal and SwapFree are close to each other. If you notice that over a period of a few days that the SwapFree is getting low, like about half the value of SwapTotal, then you most likely are experiencing the memory leak. This memory leak has been fixed in firmware version 1.3.5.9 which is linked to the firmware section of this FAQ.
Experimenting with the Media Vault
Experimenting, or its oft-misunderstood synonym, "hacking", is possible with the HP Media Vault. The HP Media Vault (MV1) uses a Broadcom 4785 MIPS-based system-on-a-chip, similar in architecture to mipsel SOCs used by other devices on the market. It runs a Linux 2.4 kernel. No FAQ would be complete without some mention of where to get information on how to experiment with it. The Open Source components of this device are linked to HP's Media Vault support web page. I've also linked them here with some help on how to compile them. Invariably, someone will like to know if telnet is enabled so they can poke around inside. The answer is a qualified 'yes'. Telnet is disabled by default, but you can enable it temporarily by accessing an unlinked web page on the media vault. You can find that page here:
http://hpmediavault/image/hptelnet.asp
Please note, that URL will be different if you changed the default name of your HP Media Vault. There is a button you can click in the upper left hand corner of the page with the label 'enable telnet' to get the telnet daemon to start running. Once you do that, you can log in as root (no password), but be careful, because if you don't know what you're doing, you can wipe out the OS, which resides partly in the flash memory, and partly on the hard drive. Having telnet available and disabled won't be a security hole provided you remember to set the administrator password after setting up your HP Media Vault. Without an administrator password set, you'd have no security anyway. Telnet can be killed when you're finished with it or it can be stopped by rebooting the media vault. If you want to leave it enabled permanently even through power cycle, that's explained in the telnet section.
There is also a serial header on the board where you can hook up a terminal with appropriate level shifter to monitor the startup messages and get to the root console prompt. Here is a page you can refer to if you need more information on that.
I'd request that if you intend to hack, i.e., make modifications to your media vault, do not plan to use HP's normal support channels should you do something that causes it to become non-functional. In other words, you're voiding your warranty in exchange for the educational value and excitement of tinkering. It's part of the code of honor among hackers not to burden a manufacturer with additional support calls due to experimentation. I will attempt to help you if you do something stupid.
The MV2 also allows hacking, but it has a completely different hardware and software stack. Discussions about hacking take place on Hacking the HP Mediavault Yahoo Group. There are also a few common MV2 hacks explained here.
Factory Configuration of the Shares
This section applies to the MV1. HP Media Vaults are shipped with a preconfigured set of Shares called FileShare, MediaShare, Backup, and CinemaNow. They are all contained on Volume1. You can rename or delete any of these shares or create new ones. You may resize Volume1, but you cannot delete it because it's used as a default location for attaching printers and storing user information. The shares were put there to get the product up and running as quickly as possible. Here is the intended purpose of each share:
- FileShare General Purpose file sharing location for PCs on the network.
- MediaShare A repository for media files such as photos, music, and videos. Preconfigured to be used with the DLNA server.
- Backup A place for storing the Shadow and DriveBackup files. The backup software is preconfigured to look for this folder.
- CinemaNow A folder with a movie pre-installed (The Bourne Identity). This file can be unlocked by following the directions in the flyer contained in the box. There are also credits for two more free movies downloadable from CinemaNow. They must be viewed with Windows Media Player or streamed through Windows Media Connect because the files contain Digital Rights Management (a form of copy-protection). The CinemaNow folder and CinemaNow movie and downloads are only available on units sold in North America.
The Media Vault (generation 1) has two fans inside, one in the mobile rack and another in the power supply. Several MV1 owners have reported that the fan on the internal mobile rack started making noise intermittently. Since most MV1's are out of warranty, it would be more economical to repair it yourself.
George S. provided this useful advice: Before repairing the fan, clean it with compressed air since fans that accumulate dust get out of balance, which causes them to become noisy, and that leads to premature wearout.
Both of the fans in the MV1 are standard fan sizes and, if necessary, can be replaced with parts that are available from on-line retailers for around $10 or less. The fan in the mobile rack is very small, but is a standard 12 volt fan that is 40 mm square and 10 mm thick. You'll likely have to replace the fan's connectors by clipping them off of the failed fan and soldering the wires to the replacement fan. The three leads on the fan are for power, ground, and tachometer. The two critical connections are the power and ground, which are usually red and black in color respectively. The tach signal is not monitored. An easy way to tell if it's the mobile rack's fan that is making the noise is to open the chassis and disconnect the power cable from the mobile rack and then power up the unit to see if the noise goes away. If so, then that's the source of the fan noise. If not, then it's probably the fan inside the power supply.
Here is an example of a 40-mm fan from on-line retailer (40 mm is the size of the fan used in the mobile rack)
http://www.directron.com/ec4010m12ca.html
Here is another that allows you to tap into the larger power supply connector so no splicing is required (thanks to George S. for finding it):
http://www.directron.com/ec4010l12c.html
Similarly, if you detect that it's the power supply's fan that is making noise or has stopped working, you can measure its size and find a replacement model. If necessary, you can solder on the original fan's connector to the wires so that it fits the header provided inside the power supply.
If the fan in the mobile rack is noisy and you don't have the second drive installed, you could simply disconnect the power to the mobile rack to silence the fan. It would have no effect on the operation of the Media Vault. The mobile rack fan is only for cooling the drive installed in the mobile rack.
This section applies only to the MV1.
HP Media Vaults support disks formatted in FAT and ReiserFS for read/write operations, and NTFS disks for read-only. A disk can be mounted using the mobile rack tray (SATA only) or via a USB connection. When formatting a drive on the HP Media Vault, the user is asked to select whether the drive should be formatted as a FAT or ReiserFS drive. If the user chooses FAT, the disk may be unmounted and plugged into a PC which can read and read and write to it because FAT is a native file system to Windows PCs. However, a FAT volume cannot become part of a mirror or concatenated volume. You must format the drive with the native ReiserFS filesystem to support those features. Another limitation of FAT is that the maximum file size cannot exceed 4GB.
Although the format of the native file system is ReiserFS, the layout of the superblock is non-standard so it cannot be removed and mounted to another Linux system unless you use some special procedures as described in this section of the FAQ.
A bug was discovered on FAT32 file sets when they exceed 100GB in size where the new data stored on them can get corrupted and show up as 0-length files and folders even though no error is reported by the copy program. These files and folders will not be recoverable. This bug was reported to HP, but no fix was found for it. The only way to avoid it is to use the FAT format only on drives smaller than 100 GB. If you want to use drives larger than 100 GB, you should format them with the native format.
On occasion, you may encounter files that cannot be deleted from the host system. You may get a message to the effect that you don't have the privleges to delete the file. If you find yourself in this situation, you can always use the Linux prompt to gain access to the Media Vault and delete the file(s). The instructions for gaining telnet/SSH for both the MV1 and MV2 are located here. Some common Linux commands are also located in that section. In the case of the MV1, the files will be under the directory "/shares/Volume1/FileShare" or the volume/share where you put them. Sometimes, simply using the chmod command will fix the problem. For example, you can cd to the directory in question and execute this command:
chmod -R 777 *
That will recursively give read/write/execute privileges to every file in that directory and below it.
If the chmod doesn't work, you can remove all files in and below a particular directory by using the 'cd' (change directory) to the directory of interest and then use the 'rm' (remove all) command like this:
rm -R *
Please be very careful with the rm -R * command. Depending on where it's executed from, it can do irrepairable damage to any Linux system. Before using that command, always 'cd' to the directory you want to delete and use the 'pwd' (print working directory) several times, and then meditate for a while, ask yourself if you really want to do it, etc., before executing it. Linux systems don't have an 'undelete' command.
The MV2 stores user data in locations like "/share/xxxx/Backup" where xxxx is usually a number like 1000 but it can change if you've added drives and removed them. So you may have to look around to find the files. The default folders on the MV2 series, namely Backup, Music, Videos, Photos, and Documents cannot be deleted from the web interface. This is by design. It's not recommended that you use the technique discussed here to delete them or instability may occur.
Finding the HP Media Vault on your network
Normally, you can browse files on your HP Media Vault on a Windows PC by using Start->Run-\\hpmediavault after you've connected it to your router and allowed it to boot up. Similarly, you can use Internet Explorer or Firefox and type http://hpmediavault into the address window to configure the HP Media Vault. If you cannot do this, it's possible that you have a problem with the NetBIOS or WINS not being configured correctly. That is explained in the NetBIOS/Wins section below.
The HP Media Vault includes a Control Center and a discovery mechanism to make it easier to use with the programs included on the CD. This discovery mechanism is invoked whenever you use the Control Center to browse, configure, map a drive letter, or backup to a Media Vault. If you cannot see your Media Vault on your network when using the Control Center it could be for several reasons. If you get the message that in the Control Console that 'No Media Vaults can be found on your network', then it is the result of the discovery protocol that runs on port 8488 getting blocked. This may happen for the following reasons:
1. Your firewall is not allowing the HP applications to access your network. Usually, you can temporarily disable a firewall to see if this is the cause. Sometimes multiple firewalls may be running on a PC, which isn't generally a good idea, so make sure you try disabling them all. A properly designed firewall should alert you the first time when an application is trying to use your network, and then allow you to enable it permanently but some will just quietly block applications without notifying the user. Here is a list of applications that come with the installation CD for the HP Media Vault:
- HPMVTray.exe - HP Media Vault System Tray utility. This utility uses broadcasts on port 8488 to help applications listed here to 'discover' MediaVault(s) on your network.
- NASSelector.exe - HP Media Vault Browse utility
- NASDriveMapper.exe - HP Media Vault Drive Mapping utility
- CDDIB32.exe - NTI DriveBackup!
- Shadow.exe - NTI Shadow
- HPEZBKUP.exe - HP Easy Backup
- HPMVCheck.exe - HP Media Vault Automatic Firmware Update
If you are prompted to allow one of these applications to access your network, please do so and make sure that you allow it 'now and every time' it attempts to use the network.
One Media Vault owner reported that Zone Alarm, despite having all of the MV apps in its 'allowed' list, still would silently block packets. In order to get around it, it was necessary to add the MediaVault to ZoneAlarm's Trusted Zone. This makes ZoneAlarm to apply 'medium' policy, which permits incoming traffic. The quickest way to do this was to go to the event log, find a line describing a blocked MediaVault packet, then clicking "add to Zone" and then 'Trusted'.
2. Your Media Vault and PC are on different subnets or have multiple network interfaces enabled. If you have a network that has different subnets, which is possible if you are using Windows Internet Connection Sharing or multiple routers, the discovery mechanism may not be able to see your HP Media Vault because its broadcast packets won't go across a subnet. An example of two separate subnets would be if your PC had an IP address that began with 192.168.0.xx and your HP Media Vault had one that began with 192.168.1.xx. If you cannot keep your PCs and HP Media Vault on the same subnet, you can work around this issue by setting up a special file on your PC called 'hpmvhosts' with an entry for your HP Media Vault and its IP address. That way all the Control Center applications will be able to find and access your HP Media Vault. Here is the procedure for doing that:
Create a file in C:\WINDOWS\system32\drivers\etc called hpmvhosts using Notepad or similar text editor. If Notepad adds an extension to the file such as .txt, make sure to use the rename command to remove it. The file should have no extension. Insert a line in the file with the name and IP address of your Media Vault separated by a single <tab> character. Your HP Media Vault's IP address may be determined by logging into your router and looking for the DHCP table to see what address it has assigned to the HP Media Vault. You can also try using Internet Explorer and typing the http://hpmediavault into the address bar and then go to the Network Settings to see which IP address it has been assigned. The contents of the hpmvhosts file should look like this:
hpmediavault 192.169.1.10
Please use the actual name and IP address for your HP Media Vault. After you've confirmed that this works, it would be a good idea to set your HP Media Vault to a static IP address so that it doesn't get re-assigned with the DHCP function of your router and edit the file accordingly.
3. You've got MAC filtering enabled on your router. MAC IP filtering is a way to secure your network by only allowing a known list of devices to access to your network. Each time you get a new networked device, you must put an entry in the router's list to allow it access to the network. The MAC address for the HP Media Vault is printed on a label on the rear panel or on bottom of the device in the case of the MV2.
4. If you have programs that create a virtual network (like ActiveSync) or add a virtual Network Interface Controller, the NTI Backup software will not be able to detect the Media Vault. For example, if you install the Microsoft Loopback Adapter. (http://support.microsoft.com/kb/839013) and try and search for a Media Vault on the network, it will fail. The way to fix this issue is to disable the virtual NIC and the NTI software will begin working again. If you have a wireless network card but are connected via a wired network interface, you may find that you have to disable the wireless interface to see the Media Vault. Similarly, a VPN (Virtual Private Network) usually will make the Media Vault invisible on the network so if you are using a VPN to access an employer's network, you will have to disable it to see the Media Vault. To disable a NIC you're not using, just go to My Computer, My Network Places, and on the left panel click on View Network Connections. Disable any NICs in the LAN or high speed Internet section that you're not using if you are having trouble finding the Media Vault through the control center.
If you can access the web interface by IP address, but not by the MV's network name, which is set to 'HPMediaVault' by default then the problem is likely related to NetBIOS/Wins name resolution. One way to test this theory is to add the HPMediaVault's IP address to the lmhosts file. You can find (or create) that file in C:\Windows\System32\Drivers\Etc. Using Notepad or similar text editor, add a single line of text with this entry:
192.168.1.111 HPMediaVault
You should use the actual name and IP address of your MediaVault. If that causes the MediaVault to start responding, you may elect to just leave things 'as is' and depend on the lmhosts file to resolve the name for you.
If you wish to troubleshoot further, you should make sure to check to see if NetBIOS/Wins is actually enabled with this procedure:
- Click Start, Control Panel.
- Double-click Network connections.
- Double-click your default network connection. (For example, Local Area Connection for wired networks and Wireless for wireless connections.)
- Click Properties.
- Highlight Internet Protocol (TCP/IP).
- Click Properties.
- Click Advanced.
- Click the WINS tab.
- NetBIOS settings are found at the bottom of the dialog box. Make sure that the NetBIOS setting is NOT set to Disable NetBIOS over TCP/IP.
If that was set to 'disable', then it was likely the source of the problem and you can remove the hpmediavault entry from lmhosts file and it should continue working.
If you find that removing hpmediavault from lmhosts causes the problem to return, then it may be that your system's firewall is blocking NetBIOS packets which use ports 135-139, which is the default behavior on many firewalls today such as OneCare, Zone Alarm, and Norton 360. You may have to go into the Advance settings to open up NetBIOS ports on those firewalls.
If you are sure it's not a firewall issue, than your system may be set up with the wrong DhcpNodeType. You can confirm this by launching a DOS window and typing the command 'ipconfig /all' and if you see that the Node Type is 'Peer-Peer' instead of 'Hybrid', then here is a registry change you can make to fix it. (Discovered by Alan B.):
- Start -> Run -> regedit Proceed INTO:
- HKEY_LOCAL_MACHINE/SYSTEM/CurrentControlSet/Services/NetBT/Parameters
- If you have DhcpNodeType there, change the value to: 8
- If you don't have DhcpNodeType there, create a new DWORD of DhcpNodeType and set its value to 8
- Close the registry and reboot.
Check to make sure that the change took by executing the DOS command 'ipconfig /all' again.
This first section applies to the MV1. The MV2 section is below under the dashes (--------). The HP Media Vault has firmware that can be updated through the Systems Setting page of its web interface. Just download the firmware file, open up a web browser to your Media Vault by typing in http://hpmediavault (or whatever name you've given it) to the address and then navigate to the Systems Setting page. Use the browse button under 'Select Firmware Update Package' and then click the button below it called 'Apply Firmware Update'. It should take about 3 minutes to finish.
The latest official firmware version is 1.3.5.9 released August 8th, 2007. The systray firmware checker should make you aware of it if your FTP port is not blocked by a firewall. Its GPL source code will be available soon. You can get a copy of the firmware here. The bug fixes in this version are listed here.
Earlier firmware versions:
- Firmware Version 1.2.5.6 binary file (14 MB)
- Firmware Version 1.2.5.6 Release Notes
- Firmware Version 1.2.5.6 GPL and Open Source components
The firmware resides partly in flash memory and partly on the System (i.e., internal) hard drive. In the event that the System drive fails, it is necessary to restore this image using some special utilities that run on a PC over the network. That's explained in the Hard Drive Replacement section.
The HP Media Vault checks for firmware updates by accessing the HP website every few days if you're running the HP Media Vault Monitor and Check for Firmware Updates is enabled. If it finds new firmware, it will prompt you to download it and install it. The software that came on the CDs, i.e., the backup applications and utilities that run on the PC are updated via a program called HP Software Update. That utility runs once a month to look for updates for multiple HP products.
Note: Some Media Vaults shipped with firmware version 1.0.4.5 which had only a minor change from 1.0.4.4 . The 1.0.4.5 version of firmware was never released as a downloadable file.
---------------------------- MV2 firmware update utility ---------------------------
The HP MV2 series released with firmware version 1.3.0.85 and has not yet been updated. However, if you want to replace or upgrade the drive in your existing MV2, you will need a way to download new firmware to it. Please note that the MV1 and MV2 have completely different code bases and the numbering schemes are not related in any way.
An MV2 firmware
update utility is available on hp.com or you can download the
MV_2100-5100_Recovery_Utility.exe file
here.
That program will install files on your computer, in the default folder of
"C:\HP Media Vault Recovery",
The 1.3.0.85 firmware image (a self-extracting 122 MB file called MVFW13085.exe) can be downloaded
from hp.com or from
here. Please note also that when
you put the MV2 in firmware update mode as explained in step 4 below, it may
self-select an IP of 169.254.100.
Please be aware that this firmware utility is intended to place an image on a blank drive. If you put it on an MV2 drive that has data on it, IT WILL ERASE ALL DATA ON THE DRIVE. There is a way to update the MV2 firmware and leave the data partition intact, but to do that, you must replace the recovery.img that comes with the Recovery Utility installation file with this one. Rename the existing recovery.img in the "C:\HP Media Vault Recovery" directory to recovery-orig.img and then place the file recovery-data.img in that directory and rename it to recovery.img. You need to do that before launching the recovery program.
Once you start renaming these files it can get confusing because they are exactly the same size and thus difficult to tell apart from each other. The original recovery.img file that overwrites the entire data partition has an MD5SUM of:
628b2bba640eb6ff57365afb41ced934
whereas the recovery-data.img that leaves the data intact has an MD5SUM of:f0ce0ea9e0bb54c3c56f232147058626.
If you need a Windows MD5SUM utility, you can get a free download of WinMD5SUM from Nullsoft.
Please note that the recovery.img file is different from the firmware.bin file. You need to have both files to perform a firmware update. Please make sure to have a backup of all your data because if anything goes wrong, your data may be lost. This procedure, i.e., updating the firmware without erasing the data is only to save time and it is not safe to assume you won't lose data.
To use the recovery program, double click (i.e., run) the MV_2100-5100_Recovery_Utility.exe file and it will install an application on your PC. You can find it in the Hewlett-Packard group under Start->All Programs called HP Media Vault Recovery. Similarly, you should run the MVFW13085.exe program to extract the firmware image. To use the MV2 recovery program, you will need to follow the procedure below. There is a step-by-step method provided here that also comes with the utility:
1) Power down the Media Vault server.
2) If a second disk has been added, remove it from the drive bay. Note: if a
second drive is installed at the time of the firmware recovery, a JBOD (spanned
volume) will automatically be created on both drives. However, if you are
using the non-destructive recovery.img, if you have a second drive
then keep it in the drive bay.
3) Locate the reset button on the front of the Media Vault. It is to the left of
the USB port. Use a push-pin, paper clip or other tool to hold the button in.
4) Press in the power button located on the back panel. Do not release either
button for 5 seconds. The health LED should flash blue/purple which indicates the MV
is in recovery mode.
5) Run the HP Media Vault Firmware Recovery program (it will be installed in the
Hewlett-Packard Media Vault Recovery group in the start->all programs menu.) Just follow the steps given by
the utility.
6) After the utility finishes it will report the firmware.bin file has been
successfully sent to the Media Vault, however the server will need additional
time to install the firmware internally. The install process can take 15-20
minutes.
7) The health LED will turn solid blue with the firmware installation process is
complete.
This section applies to the MV2 only. There is a problem with Firefox where the color codes of the drives do not match up properly on both sides of the web interface. The little boxes on the right hand side are black instead of matching the bars on the left hand side. It works OK on Safari and IE. The horizontal bars that appear on the left side of the screen are color coded and are supposed to help show how the drives/volumes are laid out on the right half of the screen.
![]()
Click on the above image for a full size version of it.
The correct image should look like the one below:
![]()
Click on the above image for a full size version of it.
There is a way to fix this by placing a new pixel.gif file in the MV's directory /usr/htdocs/images over the existing pixel.gif file. To do that you'll need to know how to SSH into the MV2. You can find a new file here: clearpixel.gif (you should right click on that link and use 'save as' to save the file on your computer). Evidently, the pixel HP used wasn't really transparent and so it turns black, at least on Firefox, but this file works on IE, Safari and Firefox. Just rename that file to pixel.gif and replace the one that is in that directory.
This section applies to the MV1 since the MV2 has no FTP server. There has been some discussion on the Hacking FAQ on how to add one.. The FTP server on the HP Media Vault is based on vsftpd. In order to access it from the outside your network, you need to forward port 21 on your router to the IP address of the Media Vault. Eventually, this server will be discovered by software robots on the Internet that will attempt to break into it by guessing username/password combinations. This is known as a 'brute force attack'. So choose a good user/password combination that cannot be easily guessed.
If you have FTP enabled and port 21 forwarded to the Media Vault, a sustained brute force attack can eventually cause it to hang. Usually, you'll see excessive hard drive activity before this occurs. It may take days or weeks to occur. The root problem appears to be filling up the RAM disk with log files that start with 'check_user' from the failed login attempts. In order to correct this, I've written scripts that will delete these files and the vsftpd.log file from the RAM disk once per hour. The scripts can be found here. Here are the instructions to install them:
Unzip the two files (startup.sh and cleartmp) and copy them into the Media Vault's FileShare folder. Log into the Media Vault using the procedure explained in the telnet section of this FAQ and execute the following commands (don't type the comments in the parentheses, they're just there to let you know what you're doing):
cd /shares/Volume1/FileShare (This changes the current directory to FileShare)
chmod 777 startup.sh (This changes the permissions on the two files so they will be executable)
chmod 777 cleartmp
cp startup.sh /shares/Volume1/startup.sh (This copies the startup file to the proper location so it will auto-launch)
Reboot the Media Vault either with the command 'reboot' or power cycle it with the power button.
Log back into the Media Vault with telnet and do a "ps" process status command to confirm that the process called 'cleartmp' is running. It should look something like this in the process status list:
278 root 608 S /bin/sh /shares/Volume1/FileShare/cleartmp
Now your FTP logs will be cleared out every hour. The default behavior of the script is to append a copy of the vsftpd.log logfile to a file stored in FileShare under the filename vsftpd-save.log if you want to look at it. If not, you can edit the cleartmp script and remove that command. If you do edit these scripts, make sure to use and editor like Notepad++ and store the file in Unix format because a script file will not run on the Media Vault if you use DOS format. This is more thoroughly explained in the startup.sh section of the FAQ.
These procedures were written to solve a single issue. If you have installed or want to install other custom software on your Media Vault, please use the method explained the Adding software section of the FAQ, and make the appropriate changes to these scripts.
Both the HP Media Vault Generation 1 and Generation 2 run a Linux kernel and so are sometimes considered attractive targets for 'hacking'. With this in mind, a separate 'Hacking the HP Mediavault Yahoo Group' has been set up and is hosted/moderated by Chris Seto, who is also a frequent contributor to the HP Media Vault Yahoo Group. We ask that discussions about hacking, especially those related to IPKG take place on the hacking group because these topics are likely to confuse anyone not familiar with the Linux operating system. IPKG is a package installer that takes pre-compiled binaries from a repository and installs them on the system. They are convenient because you don't need to know anything about compiling source code to use them. But they are also in many cases untested with the HP Media Vault, so if you wish to experiment with them, you should proceed with caution.
The generation 1 and generation 2 Media Vaults have completely different hardware and internal firmware. Generation 1 devices (mv2010, 2020 and 2040) have a Broadcom 4785 mipsel-based system-on-chip (SOC) with the OS residing on a cramfs partition on the hard drive. A cramfs file system is not writable, so all modifications have to be added to a writable partition on the hard drive, such as Volume1. The generation 2 Media Vaults (mv2120, mv5140, and mv5150) are based on a Marvel 5182 ARM-based architecture. In the case of the MV2 devices, the OS is on a writable part of the hard drive which makes it easier to hack but it has more inherent risks associated with hacking it because you can modify the OS in a way that may be hard to undo.
A few hacks have been discussed on the HP Media Vault Yahoo Group for the MV1, such as adding Firefly (iTunes) and Twonky media servers, but these are relatively benign changes. When it comes to IPKG, especially with respect to the MV2, then one must exercise caution because there are so many of these IPKG packages available and installing them has the potential to modify the libraries on the OS partition on the hard drive, and there is no easy way to 'undo' an installation like there is on the MV1. The MV1 has a hard reset which severs the tie to the startup.sh script that calls any of the installed software. The firmware reflashing tool is now available for the MV2, but it deletes all the data from the drive when it is used, so hacking while at the same time using the MV2 for its intended purpose, i.e., storing backups and files, are not compatible uses because if you need to fix it with a reflash, you'll also lose your data. There is now a separate section of the FAQ dedicated to MV2 hacking.
The IPKG instructions can be found here.
In addition to hacks to add functionality, Martin Michlmayr has put together a web site on how to install a Debian distribution on the MV2 series. Please be aware that this will remove the Media Vault's OS and user interface and turn the Media Vault into a general purpose Linux box.
This section applies to the MV1. The HP Media Vault uses standard SATA drives both for the internal system drive and for the mobile rack drive. The system drive that is mounted inside the HP Media Vault will be either a 300 or 500 GB Seagate Barracuda model. The part numbers were ST3300822AS for the 300GB version and the ST3500641AS for the 500GB versions but these numbers will change as Seagate rolls their product line. The Media Vault has a SATA II 3 Gbps controller and will work with either SATA I (1.5 Gbps) or SATA II (3 Gbps) drives.
If the internal drive fails within the 1 year warranty period, you can arrange for an exchange repair by calling HP. The number is 1-800-HPINVENT in the U.S. If you're outside the U.S., consult the warranty and support manual that came with the media vault for HP support contact information.
Some people have wondered it if is possible to replace the internal drive if it were to fail outside the warranty period or just to upgrade a 300GB internal drive to a 500GB or 750GB drive. It's not difficult to replace the internal drive, no more so than replacing an internal hard drive in a PC. After replacing the drive, you will have to re-install the operating system over the network using a special program called Nasload.exe. More about that later. If the secondary drive fails, it will be obvious because the you'll get warnings through the user interface and in the systray. However, if the main drive fails, the Media Vault will not boot up, so it will need to be replaced before you can interact with the media vault again.
You may refer to these instructions when replacing the internal drive. First lay the Media Vault on its side and remove the 3 back panel screws. Slide the side cover backward about an inch and lift it up away from the chassis. Disconnect the SATA data and power cables from the internal drive. Remove the drive bracket's single mounting screw and slide the drive/bracket out the chassis. Remove the drive from its bracket and replace the drive with an equivalent SATA drive and reverse the procedure to install it in the media vault. If the media vault has a secondary drive that contains a mirror of Volume1, it works a little differently than it does with a single drive media vault. In the case where Volume1 was not mirrored, you will need to recreate Volume1 on the system drive and to do that, you should perform a hard reset after you've installed a blank drive and before running Nasload. In the event that HP shipped you a pre-imaged drive, you will have two Volume1's along with their respective Shared Folders (FileShare, MediaShare, etc.). In this case, the MediaVault will automatically rename the Shared Folders in the mobile rack drive to FileShare2, MediaShare2, so that you can access them.
If Volume1 was mirrored, you should perform the following steps with the mirrored drive left in its slot. If you're replacing the internal drive and don't have Volume1 mirrored, then just make sure to do the hard reset first or you'll also hear the beep after loading the OS. If you find yourself in that situation, the beeper can be silenced from the System Settings page.
Nasload: Download and unzip the nasload and nasunpack utilities to a folder on a PC that is on the same network as you HP Media Vault. Download and place the latest firmware image in the same directory. A convenient location would be C:\temp since we need to use DOS to run Nasload. In the example below the filename for the image will be called Oxford_1.3.5.9.nas. Open a DOS window and change to the directory to where the firmware image and utilities are located (i.e., cd C:\temp) and execute the following command:
nasload /a /U /P /f Oxford_1.3.5.9.nas <enter>
(please note, the U and P in that command are UPPERCASE). If everything is working, you should see a response similar to this within about 10 seconds:
Attempting to download firmware to local subnet.
Use control-c to exit.
Remote machine BRCM_TEMP_NAS (at address 192.168.1.24) has requested
a firmware download.
Downloading Oxford_1.3.5.9.nas...
Transfer to BRCM_TEMP_NAS successful.
If you get an authentication failure while using Nasload, then your Media Vault has its administration password set. The workaround for this would be to do a hard reset, which will clear the password, or you can execute the nasload command with these options substituting your admin username and password in those locations:
nasload /a /u username /p password /f Oxford_1.3.5.9.nas
Using the /U /P options with uppercase letters, as shown previously, means that there is no admin
username or password set. When the username and password are set, Nasload requires that the u and p are lowercase.
If you get an error code 10054, it's because Nasload doesn't think that the drive is blank. You'll need to format it on another computer without putting a file system on it. Basically, the first 5 sectors should all be zeroed out for the Media Vault to think the drive is blank.
This utility will find an HP Media Vault on the local network that is looking for a
firmware image and download it. It will take about 5 minutes for
everything to complete. An HP Media Vault with a blank drive will only
boot to the point that it illuminates the network link light
![]() and power button.
It will respond to pings and tftp for downloading via Nasload, but will not
respond other network protocols. The power button can only be used to turn the
Media Vault on, but not off, so if you want to power it off when it has a blank
drive it it, you'll have to unplug it. Once the firmware is downloaded,
wait about 5 minutes and it will reboot and behave normally again. To exit Nasload, it's necessary to use control-c in the DOS window or it will run
indefinitely. If you didn't have a mirror, then you are done.
and power button.
It will respond to pings and tftp for downloading via Nasload, but will not
respond other network protocols. The power button can only be used to turn the
Media Vault on, but not off, so if you want to power it off when it has a blank
drive it it, you'll have to unplug it. Once the firmware is downloaded,
wait about 5 minutes and it will reboot and behave normally again. To exit Nasload, it's necessary to use control-c in the DOS window or it will run
indefinitely. If you didn't have a mirror, then you are done.
In the event that you had Volume1 mirrored, you will get an error about a missing System drive and mirror. You can then remove the reference to the missing portion of the mirror (using the remove mirror button in the Disk Settings Page). This will make the Volume1 a basic volume on the mobile rack drive. You can then set up the mirror again, this time using the mobile rack drive as the base of the mirror and the internal System drive as its mirror which should be unallocated space at this point. The operating system is always on the System (i.e., internal drive) and is not part of Volume1 so it will not be overwritten when you mirror Volume1 back on to the System drive.
If Nasload just sits there after typing in the command, it can be because a firewall is stopping it. Usually, disabling a firewall will fix this problem but there has been a report that with the built-in Windows firewall, it's necessary to enable it and specifically allow packets to pass on port 69 (the tftp port) or it won't work.
There is a wealth of documentation and support available for the HP Media Vault. In addition to the information you can find on this site, HP also has a lot of information on the hp.com website:
HP Media Vault Generation 1
- Data Sheet in pdf format
- Quick Start Guide in pdf format
- User's Guide in pdf format
- User's Guide in interactive HTML
- Warranty and Support guide in pdf format
- HP's Support Site for the HP Media Vault
HP Media Vault Generation 2
Maximum addressable limit of the media vault (1.2 TB and 2 TB limit)
The HP Media Vault series 1 has a limit of 1.2 TB of raw storage. This limit is due to the amount of DRAM it has to hold the metadata for the Reiserfs journaling file system along with DRAM space that needs to be reserved for other processes. This includes the sum of the raw capacity of the internal SATA drives and external USB drives. By raw capacity, it means that if you make a 500GB mirror using two 500GB drives, it counts as 1 TB toward this limit. You will get an error message to the effect of "Not enough memory to mount one or more pools" if you attempt to add disks much beyond this limit. The media vault's 64MB of DRAM is soldered to the board so it cannot be upgraded (at least not easily).
This is not a hard limit but rather is dependent on the amount of physical memory that may be required for other tasks in conjunction the number of volumes and number of files on each volume. There is little risk of going up to 1.25 TB ( for example a 500 GB + a 750 GB drive). There are reports that some have even mounted a pair of 750 GB drives without getting an error message. However, exceeding the limit may be a problem once the number of volumes and files increases so it's best not to push it much beyond the published limit of 1.2 TB.
The Media Vault 2 series has a published limit of 4TB, but that is using 4 separate 1 TB drives, 2 internally and 2 externally on the USB ports. Due to a firmware limitation, the maximum individual drive size on the MV2 is 1 TB. If you attempt to install a drive larger than 1 TB, you will find that it cannot successfully be formatted. There are no known work-arounds for this issue. Part of it can be fixed by installing a new version of fdisk, but there are still some script limitations that prevent mirroring volumes larger than 1 TB. It doesn't appear that HP will issue new firmware to address this issue. Those who have installed raw Debian distributions are not affected by this limit, but with a Debian distribution the MV2 becomes just a headless Linux device with no Web UI (which suits some Linux enthusiasts, but not most MV customers).
There is a forum dedicated to the HP Media Smart Server. The HP MediaSmart Server is based on Microsoft's Windows Home Server. You can find the forum here.
This section applies to the MV1. Mirroring of data across two drives (i.e. RAID 1) allows you to keep a copy of your data on two drives in the Media Vault so you won't lose it in the event that one of the drives fails. Although you can mirror across an internal drive and an external USB drive connected to the Media Vault, this is not recommended because USB drives have independent power supplies and can be off-line when the Media Vault is powered up and this confuses the process that keeps track of the mirror and will cause it to have to rebuild the mirror should it discover that the USB drive is powered on after the Media Vault has booted. It's best to use the internal drives and mirror the System drive to the drive that goes in the Mobile Rack slot. That way you can guarantee that both drives will power up and down at the same time. You can mirror multiple volumes across two drives, but most often the default volume (i.e., Volume1) is mirrored to the Mobile Rack drive. Mirroring requires twice the disk capacity of a basic (non-mirrored) volume. In other words, if you want to make a mirror of a 300 GB volume, you need another disk with 300 GB of unallocated space.
You shouldn't think of a mirror as a backup for all potential causes of data loss. It only protects you from a hard drive failure inside the Media Vault. You should always have another copy, preferably off-site, of any critical data.
To mirror a drive, go to the Drive Setting page in the web interface and select a volume you wish to mirror. If the mirror button is grayed out, it probably means that there are no drives with enough free space to mirror the volume you've selected. You can resize or delete volumes on the destination drive to make room to accept the mirror. If your source volume is exactly the same size as the unallocated space, you may need to resize it to be slightly smaller to account for round-off errors when computing the unallocated space available. If you formatted a drive you installed in the mobile rack, then it will likely contain a simple volume that occupies the entire drive. You will either need to delete this volume, or resize it to make room for Volume1, if you're trying to mirror Volume1 to the mobile rack drive.
After you've selected the volume to mirror and the destination drive for the mirror, it will take several minutes to set up the partitions before the web page will refresh. Then in the background, it will copy the data on one drive to the other. This process generally occurs at about 40GB/hour and you can monitor its status by refreshing the Disk Settings page and it will give you a percentage complete and the time left to complete the mirror. During this time, the Media Vault will be available with minimal affect on performance for most tasks. A 500 GB drive will take about 12 hours to mirror but there are a few ways to speed this up. A method you can use if you don't have much data on the Volume you're mirroring is to first resize it to a smaller volume and then create the mirror, and then resize the mirrored volume to full size. Using this method you can create a 500 GB mirror in about 10 minutes if you are able to resize to something very small like 2 GB. The reason for this is that the mirroring process doesn't really know what data to copy so it just copies all the blocks on the base volume to the mirror. In the case of resizing a mirror, the process understands that the new area created will be blank, so it knows not to spend any time copying that portion of the disk.
Another way to speed up the process, albeit at the expense of overall performance for other tasks, is to change a few variables. Do do this you need to telnet into the Media Vault and execute these two commands:
echo 150000 > /proc/sys/dev/raid/speed_limit_min
echo 2000000 > /proc/sys/dev/raid/speed_limit_max
This will cause the mirroring to occur at about 160GB/hour. The original values for speed_limit_min is 10000 and for speed_limit_max it is 1000000. They will revert to those values when you power cycle the Media Vault. Speeding up mirroring using this procedure will slow down file transfers so it should be used only if you don't intend to be doing anything else for a while with the Media Vault. (This tip was provided by Pedro B.)
In the event that a mirrored drive fails, the procedure for getting your data from the mirror is covered in the Hard Drive Replacement section of the FAQ.
Mounting a Media Vault Drive on a Linux System
Should the Media Vault ever become non-operational due to a motherboard or power supply failure, it's possible that the data on the drives is still intact and could be retrieved by mounting them in another Media Vault. However, Media Vaults are not as common as PCs and so people sometimes ask if the drives could be mounted in a Windows PC via a SATA-USB interface to retrieve their data. As of October, 2010, this is now possible thanks to a utility for the MV1 from CNW Data Recovery as explained here. If you are skilled in Linux, there is also a is a technique to mount an MV1 drive on a Linux system covered in this section of the FAQ.
In the case of the MV2, the file system is completely different than the MV1 since they run different processors, Linux kernels, and underlying code to control the device. The MV1 and MV2 drives cannot be interchanged. The MV2 uses the more common ext3 file sytem, but it runs on top of the Logical Volume Manager (LVM) to implement RAID fuctionality. Because of this, you need to perform some extra steps to mount it on a Linux system.
After installing an MV2 drive in a Linux system either on the SATA bus or on a USB-to-SATA converter, you can follow the example given below to mount the volume.
Here is the sequence of events to mount an MV2 drive on a Linux system: First create a mount point at /tmp/nas with the mkdir command. Then use the pvs command to find the logical volume name(s). Then use the lvdisplay command to get the full name of the volume. Finally, mount the volume under /tmp/nas. An example of commands to do this are shown below ( please note, the volume names are unique to each drive and the example below is just an example. You should use the names that are shown by the pvs and lvdisplay commands on your Linux system):
# mkdir /tmp/nas
# pvs
PV VG Fmt Attr PSize PFree
/dev/sdc6 WD-WCASY0804803 lvm2 a- 593.00G 0

# lvdisplay /dev/WD-WCASY0804803
--- Logical volume ---
LV Name /dev/WD-WCASY0804803/WD-WCASY0804803-1000-1
VG Name WD-WCASY0804803
LV UUID AM2qEH-xerl-H1k0-s8Xu-mznN-6nwR-0F04or
LV Write Access read/write
LV Status available ...

# mount -t ext3 -o ro /dev/WD-WCASY0804803/WD-WCASY0804803-1000-1 /tmp/nas
If your data is still on the drive, it should be located under /tmp/nas
This section applies to the MV1. Most Linux distributions today support SMB (CIFS) browsing via the Gnome or KDE graphical user interface (GUI). If you need more flexibility than the GUI offers, you can make a mount point directory and mount the HP Media Vault's folders directly. Before explaining how to do that, you should see if your Linux system can resolve the NetBios name of your HP Media Vault, which by default would be 'hpmediavault' unless you have changed it. If you can ping the media vault by its name from your Linux system, then you have the correct modules installed. If you cannot ping it, then you can perform these simple steps to allow NetBios name resolution. These steps are for a Ubuntu 6.06 Linux distribution and may vary depending on which distribution you're using. Some of the commands below will require you to be superuser (sudo su) or precede them with the sudo command.
edit /etc/nsswitch.conf with vi or gedit
and change the line that has:
hosts: files dns mdns
to this:
hosts: wins files dns mdns
Then install winbind:
sudo apt-get install winbind
after that, you should be able to ping your HP Media Vault:
ping hpmediavault
If the HP Media Vault begins responding to the ping, it becomes much easier to access with the browser or with the mount commands shown below because you no longer have to know its IP address.
Below are examples using a mount point at /mnt/mediavault via the command line. First you need to create a location where you can mount the share. Here is an example of making a mount point with the mkdir command:
mkdir /mnt/mediavault
/mnt/mediavault is the directory where we will demonstrate mounting a shared folder from your HP Media Vault. It's an arbitrary mounting location. You can just as easily create the directories for mounting shares anywhere you like. Here is an example of mounting one of the default shares (FileShare) when the HP Media Vault's IP address is 192.168.1.10:
mount -t nfs 192.168.1.10:/shares/Volume1/FileShare /mnt/mediavault
or
mount -t nfs hpmediavault:/shares/Volume1/FileShare /mnt/mediavault
The user ID and group ID (UID/GID) numbers for the Media Vault are determined by its internal software. You can find them if you telnet into the Media Vault and perform an ls -l on a directory to see the file information. When you select to use user mode, each user is assigned its own UID as it is set up. You could go into your Linux system and set up the users to match the UID/GID of how they are set up on the Media Vault. This is typically how NFS works, i.e., you need to synchronize those lists across machines. In the case of the Media Vault, the numbers are not user selectable, so you need to make the changes on other computers that do allow you to edit the UID/GID values.
If you prefer to use the SMB instead of NFS, you can mount a share with a command such as this:
mount -t smbfs //192.168.1.10/FileShare /mnt/mediavault
or
mount -t smbfs //hpmediavault/FileShare /mnt/mediavault
If you get an error about not understanding the file system, you may need to install smbfs using this command:
apt-get install smbfs
To unmount the folder, use this command:
umount /mnt/mediavault
to see what's mounted:
mount
If you would like your Linux system to automatically mount the Media Vault whenever it reboots, you can add this entry to /etc/fstab
hpmediavault:/shares/Volume1/FileShare /mnt/mediavault nfs
Please note, your Linux distribution may require a different order that what is shown above. That order works on Ubuntu. After adding the line to the /etc/fstab file, you can run the following command to get it to process the fstab file:
mount -a
John S. has posted a few more details for automounting your Media Vault ona Ubuntu system that takes permissions into consideration.
If you find that your Linux system is very slow at mounting the Media Vault via NFS, for example, taking a few minutes to mount, make sure that you have portmap installed and running on your Linux system.
This section applies to the MV1. The HP Media Vault can access NTP time servers to periodically synchronize its internal clock. You can find this feature in the System Settings.. It re-synchronizes the internal clock once every 3 days. The default IP addresses that are provided are 192.5.41.40, 192.5.41.41, and 133.100.9.2 . Two of these NTP servers are run by the U.S. Naval Observatory and one is run by Fukouka University in Japan. You can change the IP address to any valid NTP server you like, but it must be in the form of an IP address, because it cannot translate the network name. If you know of a server that you'd like to use instead of the defaults, you can use nslookup to determine its IP address. For example, in a DOS window, if you type "nslookup time.nist.gov" and you'll get a response like this:
time.nist.gov 192.43.244.18
By placing that IP address 192.43.244.18 in the NTP Server field, then your HP Media Vault will start with that NTP server instead of the default address. You can have as many as three addresses to check in the event that one or more of them is not responding.
There are 'rules of engagement' that state that NTP StratumOne servers should not be contacted by client devices. There have even been a few notorious cases where some vendors' router products were collectively accessing a single StratumTwo NTP server thousands of times per second, which brought the server down or overwhelmed it. If you want to restrict your HP Media Vault to using only StratumTwo servers, you can do an nslookup on one of the pool.ntp.org server groups like 0.pool.ntp.org to get a list of other valid IP addresses that host StratumTwo NTP servers. This list of servers is a second tier that gets its time from one of the StratumOne servers and this spreads out the load and makes it less likely to overstress the public hosts. Similarly, if you wish to use an NTP server in your own country for better response time, you can look up its IP address(es) and substitute them in the NTP server fields on your Media Vault.
NIST runs a set of time servers and has provided their IP addresses and instructions on how to use them to keep your PC's clock synchronized with their NTP servers.
Please note, firmware version 1.2.5.6 released on Feb 22, 2007 fixed the limitation of only being able to use IP addresses. You may now also use the URLs for the NTP addresses. I recommend you use the address pool.ntp.org.
This section applies to the MV1. The HP MediaVault can be safely overclocked to improve performance. The normal CPU/bus frequencies as shipped are 300MHz and 133 MHz respectively. You can go up to 320/160 safely which yields a performance improvement of about 10% on writes and 30% on reads. I've experimented with frequencies up to 384/164 and that will produce about a 20% performance increase in writes and 35% in reads over the default settings but if you go above 320/160, you do so at your own risk because not all CPUs can operate reliably in that range. If you've ever overclocked a CPU, you are aware of the risks. To overclock the HP Media Vault, log in using telnet and execute these commands:
nvram set clkfreq=320,160
nvram commit
reboot
Do not use any other frequency pairs in the clkfreq variable because there are only certain pairs that work, and the ones mentioned above (300/133, 320/160, and 384,164) are valid pairs. If you find that your Media Vault is unstable after overclocking, you can always get it back to the original values by performing a hard reset.
If you are already connected to the Media Vault using it as a shared network drive with one set of user credentials, it will not allow you to connect again from the same PC with a different set of credentials. This is a shortcoming of Windows (NetBIOS) file sharing. It will give you an error. The error will say something like this:
The text in the message will be something like this: "\\HPMediaVault\share is not accessible. You might not have permission to use the network resource. Contact the administrator of this server to find out if you have access permissions.
Multiple connections to a server or shared resource by the same user, using more than one user name, are not allowed. Disconnect all previous connections to the server or shared resource and try again.
Now, if you set up your MediaVault as a backup device using Shadow, you'll likely have a persistent connection to \\HPMediaVault\Backup which is one of the public default folders it selects when you set up a backup. You can check for this or other connections by getting into DOS (Start-> run -> cmd) and type in 'net use' to see what network connections are open. If you see any open on the Media Vault they will look like this:
C:\Documents and Settings\user>net use
New connections will be remembered.


Status       Local     Remote                    Network

--------------------------------------------------------------------------
OK           W:        \\HPMediaVault\Innerweb   Microsoft Windows Network
OK           Y:        \\HPMediaVault\Music      Microsoft Windows Network
OK                     \\HPVediaVault\Backup     Microsoft Windows Network
The command completed successfully.
These exisiting network connections are likely the reason you are getting the error message so you'll need to disconnect from those folders before you can connect to a folder that requires a different user/password. To do that, you can temporarily turn off your Shadow jobs, so it won't complain and use a few DOS commands like this:
net use \\HPMediaVault\Innerweb /delete
net use \\HPMediaVault\Music /delete
net use \\HPMediaVault\Backup /delete

or, if you want to quickly disconnect from all network drives:

net use * /delete
Then you should be able mount password-protected shares to that PC without getting the error that you don't have permissions. But remember, you can only connect to the MediaVault using one user per PC at a time because of this Windows restriction.
Why does this happen? Usually because the software that comes with the Media Vault will make a connection or two at startup due to having a backup job or a drive letter mapped. It's best to be consistent with user/password combinations so that you have only one identity on the Media Vault per PC. Even if you connect to a public share, that counts as one identity, and it takes your PC's user/password combination from Windows and so if you try connecting to a private folder that requires a different set of user credentials, then you'll get that message. If you wish to avoid this, you can try matching the user/password on your Media Vault to that of your PC and that way your public connections will be consistent with your private connections and it won't look like you're trying to use two different sets of credentials from the same PC.
The PC Restore CD that comes with the HP Media Vault (MV1 and MV2 Pro models only) is bootable and is intended to restore your hard drive in the event of a hard drive crash. It works in conjunction with NTI Drive Backup! which is accessed through the control panel under the 'Back up your Entire Hard Drive' menu . In order for it to work, your BIOS has to be set up to boot from a CD, which is generally set by default, but if it's not booting up when the CD is in the CD/DVD drive and the PC is shut down and then powered on, please check your owner's manual for the PC to check the BIOS to make sure that the CD appears in the list of bootable drives.
In order for the Restore CD to work, it must be able to find the HP Media Vault on your network, so it can find the Disk Backup files. These are the files stored when you select the menu item 'Backup Your Entire Hard Drive'.
If you can't see the Media Vault when booting from the PC Restore CD or you're getting an error, it could be a problem with the CD not having drivers for your PC's network interface controller (NIC). This is a common problem when your PC's network chipset is new, because the drivers may not have been available at the time the PC Restore CD was released. If you get a message that it "Failed to install network adapter check winbom", while booting from the Restore CD, then it's probably because the driver for your network adapter isn't on the CD. The PC Restore CD will need to be updated periodically to add support for new networking chipsets as they become available. For example, Version 2 was released in February, 2007 and included support for more NICs than the original CD. You can check this section on how to download/order a new version. If after making sure you have the latest version you are still seeing a winbom error, read on and you can see if the latest ISO image of the PC Restore CD will work. It would be helpful if you knew which networking chipset your computer has so I can look to see if it's supported in the latest release.
A newer PC Restore CD image (Version 2) is available for downloading from hp.com. Just search for media vault software" and follow the links to "software and drivers" for the HP Media Vault. This image has added more support for modern Gbit NICs. If after using that image, you still have the same problem, you can find the very latest unreleased ISO image of the boot CD here. It was created 04-24-2009 so if your PC was manufactured after that time, you may find that it has an unsupported network interface.
If you haven't tried booting from your PC Restore CD, it's better to do it before you have a hard drive crash to make sure it can find your Media Vault and backup files. It won't perform the restore unless you specifically click on the button that starts the restore so there's no danger in booting from it to just to check to make sure it can find your Media Vault and backup files.
Another option, if your networking card is not supported, is to install a networking card that is based on a common chipset like a 10/100 BaseT 3com or Realtek chipset. You can even borrow a card temporarily for the restore, and remove it later.
In some instances, you may be able to boot from the PC Restore CD but it won't recognize the your PC's SATA hard drive which can cause it to crash with a blue screen. If you are in this situation, it's sometimes possible to go into the BIOS and change a setting so that the SATA controller can be put in 'IDE mode' as shown here which allows it to be recognized by the PC Restore CD. After you've restored the image to the hard drive, you can set the BIOS back to SATA native or RAID mode.
Another issue with the PC Restore CD is that it will not recognize a Media Vault that is set to user mode unless you set up a user/password of guest/guest. The Guest user doesn't need to have any access privileges, it just has to be set up. In Workgroup mode, if you have an administrator password set, you may need to disable it temporarily in order for the PC Restore CD to recognize the Media Vault.
Both versions of HP Media Vaults are very energy efficient. A single-drive media vault consumes less than 25 watts while it's operating. A two drive version consumes less than 35 watts. This is less than half the power consumption of a typical PC. Also, the HP Media Vault can spin down its drives after a user-configurable period of inactivity. When the drives are spun down, the media vault consumes less than 17 watts. It will wake up and respond to a request in less than 10 seconds from the spun down state.
The Media Vault is also very quiet. The acoustic noise has been measured at 28.6 dbA using the ISO 7779 method with both drives operating.
This section applies to the MV1. The power switch on the HP Media Vault is a toggling type switch that will remain in its last known power state. It's important when turning it off or on to push in on the switch until you can feel it click. Otherwise, it may spontaneously turn itself off after powering up. The reason for this kind of switch is so that in the event of a power failure, the media vault will return to its last known power state. Some NAS devices will automatically turn themselves on after a power interruption which may not be the desired behavior.
When turning off the HP Media Vault, the 'OK' status light will blink for approximately 10 seconds while the operating system is shutting down. After the front panel lights go out, it's safe to unplug it. A typical startup time will be less than 90 seconds from the time the power button is pushed. When both the green 'OK' and Network Link activity lights are illuminated, the HP Media Vault is ready for use.
The power button on the Media Vault doesn't have the feature that you find on PCs where holding it down for 5 seconds does something different than pushing it momentarily.
The power supplies on both the MV1 and MV2 were leveraged from other HP products. In the case of the MV1, it was built on a slimline PC chassis. It's a custom 108W ATX supply because it has a custom case and smaller connector. A regular ATX power supply connector won't work. You can find a replacement here: www.atxpowersupplies.com. It's the model ATX FSP270-60LE-SL or FSP200-50PLA2-SL. You may want to check on Ebay and search those part numbers to get a better price.
The MV2 uses a power supply that is external and was used by many HP laptops. It's a model with P/N DC359A 65W, 18.5V, 3.5A. If your do an Internet search, you'll find many sources for it.
This section applies to the MV1. The HP Media Vault can support up to three USB-interface printers that may be used as shared network printers for Windows computers. Whenever you connect a USB printer, the Media Vault will attempt to mount it and make it available for sharing. The printer can be seen when you select 'Start Browsing your HP Media Vault' from the media vault's control panel. It will look like a printer icon shown below.
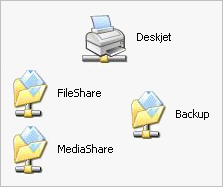
Sharing a printer is helpful if you have computers in your home that don't need a dedicated printer. The Help and Support tab of the Media Vault Control panel has a section on how to physically connect the printer and how to install the driver for it. Those instructions can be found simply by typing in 'printer' to the search box in the on-line user manual and are linked in a location that will look like this:
C:/Program Files/HP Media Vault/UsersGuide/printer.html
These instructions will walk you through adding a printer to your HP Media Vault. It uses an example of a printer that has drivers included in Windows XP. However, some printers do not have drivers that are included in Windows XP. For those you will either need to find the printer's installation CD and tell the setup wizard know that you have the disk (Have Disk) or you'll have to download the drivers from the printer manufacturer's support website and install them on the PC. If you do that, pay attention to the installation procedure so you can locate the folder where the drivers were installed. Then you will need to navigate to the location where the drivers are located, i.e., a subfolder on the CD drive, or the folder where they were installed on the hard drive after downloading them from the Internet and running the installation procedure. It's the 'Have Disk' menu selection that instructs the printer installation Wizard that you will let it know where the drivers are located.
Some printers cannot be networked. These usually include very low-cost printers that don't use standard print languages called 'host printers' because the page is rendered on the PC and sent via a non-standard printer language that cannot be sent over a network. Also, if your printer is an all-in-one device, that is, contains not just a printer, but also a scanner, fax, card reader, etc., it's not a good idea to attach it to your HP Media Vault. There are no network drivers that will allow the scanner to communicate with a PC over the network and so you'll lose the scanning functionality and is not supported by HP. You may also get error messages related to the card reader about having 'broken drives'. So it's best to just stick with regular printers when using the printer sharing feature. HP's support web site has a list of HP printers that are not supported so it would be a good idea to check it out before trying to connect your printer to an HP Media Vault. If you can't get a printer working after about an hour of fiddling with it, it's probably not going to work and it would be best to find some alternative method of sharing the printer.
If you have the Media Vault set up in User Mode, you will need to map a drive letter to your PC first to establish the password-protected connection between the PC and the Media Vault before being able to access a shared printer.
If after a firmware update your printer appears to be missing or is not functioning, it is necessary to power cycle the printer. Power cycle means to turn a device off and then back on.
There are a few printers from Brother and Canon with device names that include '/' characters. These do not work with the HP Media Vault.
Media Vault Generation 1
- CNet reivew (10-13-2006)
- GeekBriefs (10-24-2006) video podcast episode 84 (paid commercial)
- Laptop Magazine (11-1-2006) Editor's Choice Award
- Tom's Networking (11-21-2006) now called SmallNetBuilder.com
- Extreme Tech (4-29-2007)
Media Vault Generation 2
This section applies to the MV1. Please make sure before trying anything below that you have set an administrator name and password because you don't want anyone to be able to access the data and configuration settings on your HP Media Vault.
Since the HP Media Vault has both FTP and HTTP servers, you can use it to share files remotely to computers outside of your local network. This takes a little work, but the outcome may be well worth the effort. Previously, I had recommended that the first thing you should consider is to sign up for a dynamic DNS service. Before you do that however, I'd recommend you enlist the help of a friend using your external IP address as assigned by your broadband provider to confirm that you can access your network from outside your home. The IP address assigned to you by your broadband provider is generally available on one of the configuration pages of your browser. You can also try clicking here to see what this server thinks is your external IP address. This server believes your home's IP address is 216.73.217.88 provided you're not using using a proxy server.
You should use this IP address to make sure you can access your network before attempting to configure a Dynamic DNS server. To do this, you'd first forward a port 80 on your router to port 80 on your Media Vault. Then have someone from outside your network use a browser like IE or Firefox and type in: "http://your.external.ip.address" where 'your.external.ip.address' is a number like 216.73.217.88 as given by the link above. This should allow your friend to see the configuration screen on your Media Vault. After you confirm that's working, then you can sign up for a Dynamic DNS service. It might not be a bad idea to check with your broadband provider directly to see if they block incoming requests on port 80 to save yourself any unnecessary troubleshooting.
There are several free dynamic DNS services available. One of the popular services is from Dyndns (www.dyndns.org) which is the one I use. Once you sign up with a service, you will either need a router that has a feature that supports dynamic DNS or download and install a free client on one of your PCs that will contact the service any time your IP address changes. Most modern routers have this feature built-in and that's the best place for it, since your router is always on and always knows your external IP address. Basically, either your router (or PC) needs to keep the Dynamic DNS service aware of your current IP address, which can change periodically.
Since the HP Media Vault is set up to get its local IP address from the router using DHCP, its local IP address can also change periodically and this would not work for port forwarding. Some routers allow you to 'reserve' a dynamic IP address so that it will stay put even though your media vault would be set up as a DHCP client. If your router doesn't have this feature, it's still possible to go into the Network configuration page on the HP Media Vault and configure it with a static IP address outside the range where the router assigns DHCP addresses and that way its address will not change unexpectedly.
Setting up port forwarding is different for every router. If you refer to your router's manual, it will generally explain it. If you can't find it there, there's a website called http://www.portforward.com/routers.htm that has the instructions for virtually every router that supports port forwarding. HTTP requests generally come in on port 80 which is the same port that the Media Vault uses for its web configuration page and for web-based file browsing. So getting this to work can be as simple as forwarding port 80 to your Media Vault and you're done. I would suggest you try that first. The Media Vault also offers a web server on port 8080 that just exposes the folders that are shared via HTTP. You may prefer to use that port if you want people accessing the Media Vault externally to not see the configuration screen.
Sometimes your ISP will block for inbound requests than the standard HTTP port 80, and if they do, you need to find a port that they are not blocking inbound requests and use it instead. This requires that your router supports remapping of different internal/external ports. The D-link DGL4300 supports this feature, but the popular Linksys WRT series does not. Say for the sake of argument you choose port 8006. What you'll need to do is forward port 8006 on your router to port 80 on your HP Media Vault. Once you've done that, you should create a share on your media vault and open it for HTTP access. Don't leave all your shares open for HTTP access without passwords unless you are OK with people snooping around in that data. If you password protect the share in Workgroup Based Access mode, you may find it necessary to use the share name as the username. You must also supply the password of the share. For User Based Access mode, the user names and passwords will be those that are set in the User setup menu.
If your broadband provider is blocking port 80 forcing you to use a different port, you can email the location that would look something like this:
http://membername.dyndns.org:8006/shares/WebFolder/index.html
In the example above, the 'WebFolder' would be a top level shared folder you create in the Shared Folders tab such as FileShare, or MediaShare..
It's a good idea to create a new Shared Folder for your web pages to keep them separate from any other items that you don't want shared on the Internet.
This example assumes you've selected port 8006 for incoming HTTP requests and forwarded it to your media vault's port 80. It also assumes your name at Dyndns is 'membername' and you've set up a Shared Folder called WebFolder and have enabled it for HTTP sharing and have a web page stored on it called index.html. Please note that you have to specify the page with HTML in it or nothing will be served. The web server on the HP Media Vault won't serve a default page (like index.html) if only the folder name is given.
Don't plan to host a website on your HP Media Vault if you think that the website will get hammered with lots of traffic. ISPs generally limit upload bandwidth to a much lower speed than download speed to discourage people from hosting high bandwidth websites for free. A web site hosted from the inside of your home is best for lower volume needs, such as personal web pages and for sharing personal photos with friends and family members. If you Media Vault is set up in User Mode, the share will automatically be password protected. If you are in Workgroup mode and you want more privacy, you can optionally password protect the share.
There are a number of photo organization tools such as Picasa that make it easy to create folders full of photos complete with captions and HTML thumbnail navigation. If you'd like to share them, you can just generate a webpage from the photo application and drag and drop it onto a Share on the media vault that is open for HTTP sharing. Then you can link it to another web page, or email the link to those who you'd like to share the photos. The advantage of this is that there are no web hosting costs nor is your data locked on some photo sharing service.
If you want to use FTP, it's best to just forward port 21 on your router to port 21 on your HP Media Vault. Then use a FTP client like WS_FTP that can use passive mode. FTPing from a web browser or DOS window doesn't seem to work very well through some home routers. Since there is a feature on the HP Media Vault that allows you to browse folders with HTTP which allows you to download and upload files to the media vault, there's probably not too much need for FTP, but it's still nice to have it around. If you password protect a share in Workgroup mode, it's necessary to use the share name as the username and you must also supply the password of the share when prompted by the FTP login. For User Based Access mode, the user names and passwords will be those that are set in the User setup menu.
The URL for navigating the files on a share from outside your home would look something like this:
http://membername.dyndns.org:8006/share_browsing/browse_shares_frame.asp
That gives you a way to navigate and will even allow uploading of files if the share is open for writing. It's a good way to dump a huge file on your HP Media Vault remotely.
In the event that your router doesn't support port re-mapping of port 80, it is possible to start up another web server on the Media Vault on a different port as explained by Alexander Kent:
For those of you trying to access the web interface of either the HP MV2010 or HP MV2020 Media Vault but are faced with a inbound port 80 blocking ISP there is a workaround. First enable telnet access on the Media Vault
Then once connected via telnet enter: httpd 88 /www/English y
After typing the above; verify the alternate port by navigating to http://hpmediavault:88
Where 88 in the above yields the alternate port of 88 (you might have to try a few higher ports in case your ISP blocks port 88 as well). Next, consider writing a small startup script to reinitialize the alternate port after a system reboot. To do this we need to use a text editor which allows saving files as UNIX (ANSI) like Notepad++ and create a file called startup.sh.
#!/bin/sh
# this is a startup script to start httpd.bin on port 88
httpd 88 /www/English y
Next move the startup.sh script to /shares/Volume1/ then reboot the media vault device, which will automatically run it upon startup. Finally, don't forget to configure any network devices such as any routers accordingly to allow access from the internet.
Gerard noted that an even easier way to remap the 2 internal http servers is by changing their default NVRAM parameters which are:
web_browsing_port=8080
web_configuration_port=80
To set an NVRAM parameter, the command sequence would be:
nvram set web_browsing=8006
nvram set web_configuration=8008
nvram commit
That will change the configuration web server to port 8008. To access it, you'd need to add :8008 to your http requests, i.e. http://hpmediavault:8008.
This section applies only to the MV2. One of the Media Vault Yahoo Group members (Reuben) was looking for a way to remotely shut down the MV2 after completing a backup each night. He discovered that using a batch file could launch a Firefox browser and send the HTTP packet to the MV2 which simulates shutting it down from the Systems page of the web interface. Here's how it's done:
Create a batch file, for example "shutdown.bat", and copy what is between the "-------" into it, then save the file.
If you don't want your PC turning off too remove the first command. This assumes the following:
- HP Media Vault is located @ http://192.168.2.104. (MV2)
- Batch file is launched from a PC that has connectivity to the HP Media Vault.
- Firefox is installed, but this should work with any browser.
- You're running Windows, but this should theoretically work with ANY operating system that can launch an internet browser.
90 in the first command represents 90 seconds and can be changed to whatever you like, but that's for Windows. The commands are shown below.
-----------------

rem shutdown the pc via the shutdown.exe command:
C:\WINDOWS\system32\shutdown.exe -s -t 90

rem shutdown the HP MV-5150 via the web shutdown function:
"C:\Program Files\Mozilla Firefox\firefox.exe"
"http://192.168.2.104/global/system_settings_m.xml?status=shutDown"

exit

------------------
Please note, you should also be able to substitute the Media Vault's network name (eg., hpmediavault) for the IP address. Also, line beginning with "C:" should be combined with next line beginning with "http".
Resetting administrator password and factory defaults (hard reset)
This section applies to the MV1. The HP Media Vault's default is to have no Administrator username or password required. That means anyone can do anything they like to the HP Media Vault including accessing or erasing its data. So it's very important to set a secure password, especially if you're thinking about allowing remote access. If you ever forget the Administrator username/password, you can reset it to the default by holding down on the small recessed reset button on the rear panel for 10 seconds while the unit is powered on. You'll need a small pointed tool to reach it like a pen. This will also reset a few other customizations you may have made to the Media Vault, for example, its network name will revert to hpmediavault, but it will leave the data alone. It will also revert to Workgroup mode, so if you had it set up in User mode, you'll have to set that up again. Pressing in on this button will cause the Media Vault to reboot immediately. While it's restarting, it reads the state of the button again about 6 or 7 seconds later. That's why it's important to hold it down for 10 seconds to insure pressing the reset doesn't just power cycle the Media Vault, because to reset the password, it needs to see that the button is pressed in during power up so it will rewrite the default NVRAM parameters.
Make sure to reset the administrator password after you've performed this procedure.
-------------------------------------------------------------------
This section is for the MV2 (the MV2120, MV5140 and MV5150).The HP Media Vault includes a process allowing the customer to reset many parameters back to default factory settings; without losing data already saved to the drives. Some of the parameters that are reset:
- Administrator user name and password
- Workgroup
- Time Zone
- LED Controls
- Language
- Network Settings
You will need a paper clip, straighten out one of the bends in the paper clip. Locate the small opening between the USB port and the health LED. Insert the paper clip and hold the button down for 10 seconds. If you simply press and release the reset button you will simply restart the system.
Location of reset button
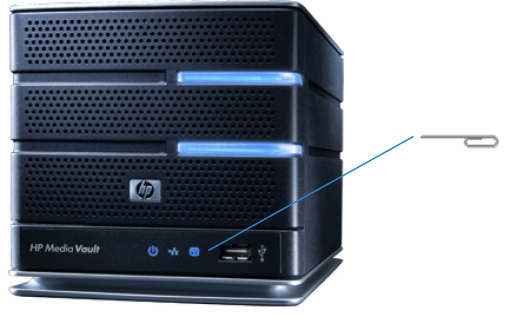
The following occur when you successfully reset the system.
- Administrator password is cleared
- Administrator user name is cleared
- Workgroup is changed back to WORKGROUP
- Time zone changed back to Mountain Standard Time
- Change LED controls back to On
- Default language is set to English
- Network configuration is set to DHCP
- Network name is set to "HPMediaVault"
Resizing and mirroring existing volumes
This section applies to the MV1. The MV2 does not have the ability to resize volumes. When you add a new drive to the mobile rack slot, before you can use it you will need to either need create a new volume, or mirror an existing volume to the new drive, or span a volume to it. If you have a lot of files on the volume you wish to resize or mirror, you could run into trouble if the Media Streaming is enabled. You may get an error stating that the operation cannot be completed or you may find it did not complete correctly. If you encounter this situation, go into the Media Streaming settings and disable media streaming on all folders. After the resizing or mirroring operation is complete, you may re-enable the folders for media streaming.
Also, be aware that the resizing can take a lot of time to complete, and that while it's occurring, you should notice that the disk activity light is blinking on the front of the Media Vault and the Media Vault will not be available either via the web interface or as a drive letter. This is true whether you're increasing or decreasing the size of a volume. Do NOT interrupt this process. If you want to check on its status, you can telnet into the Media Vault and run 'top', provided you had enabled telnet before the process was started. As long as you see a process called 'reiserfsck' running, it's still working on the resizing. This could take up to an hour or more.
Running out of disk space error on an MV2 when there is still more available
A few people have noted that they ran out of disk space before the hard drive on their MV2 disk was full. Usually, the reason for this is that there is also a limit on the number of files that can be stored. The Ext3 file system uses an inode for each file and folder and as a result, the limit on the 500GB mv2120 is approximately 473,000 files. The inodes are created at the time the disk is formatted. If your average file size is 1MB or greater, then this will not be an issue for you. However, if you have many small files, then you can get a message that you are out of space while still showing additional capacity available in the web interface. HP is aware of the issue but doesn't appear to have a plan to fix it.
To check to see if you have this issue, you can SSH into your MV2 using procedures found in the telnet section of the FAQ. Execute the command 'df -i' and you should see an output like the following:
# df -i
Filesystem            Inodes   IUsed   IFree IUse% Mounted on
/dev/md6              473728  229018  244710   49% /share/1000
/dev/md7              476928   47379  429549   10% /share/1894
If either of your drives show a value for "IUuse%" that is close to 100%, then you've reached the inode limit, and this is likely the reason you're getting a message that your drive is full. One possible work-around is to use a backup program that stores individual files in larger image files, or you may try using Winzip or a similar program to reduce the number of individual files.
If you find that running out of inodes is not the cause of the problem then reloading the operating system may fix the issue. There is a firmware update technique for the MV2 explained in the FAQ firmware section that allows you to update the firmware without erasing all your data, but it's always best to make sure you have a backup before attempting to update the firmware.
The MV1 series didn't have this problem because the Reiserfs file system generates inodes as needed.
There is an installation CD that comes with the HP Media Vault that contains
some very useful utilities. A Media Vault can be used as a shared network
drive without installing any software on a PC, but you'll be missing out on much
of its value if you don't install the included utilities. You can just plug the Media
Vault into a router and within about 90 seconds, turn it on, and it will finish booting.
After that you can use the Start-> Run ->
\\hpmediavault to explore the folders on the
device. Similarly, you can type
http://hpmediavault into your Browser to
configure it. However, to get the most utility out of it, you should
install the Backup software from the installation CD which will also install some utilities on the PC.
During the installation, you'll be prompted to answer some questions to help you
map the HP Media Vault shares as drive letters on the PC as well as some Backup
configuration. You can skip those steps if you like, because you can
always come back to them later. Once you've completed the installation, you'll see a small
'MV' icon (shown circled in red below) in the system tray as shown below.
Please note: the MV2 software has an icon that looks like the product, i.e.,
like this -> ![]()
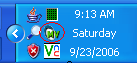
If you double click on the icon, it will launch a Control Center screen as shown below:

Control Center appearance of Generation 1 Media Vault products (mv2010, mv2020, mv2040)
This utility makes it much easy to interact with HP Media Vault. For example, if you want to browse the files, map a drive letter, configure the media vault, or set up a backup, this utility will find the HP Media Vault(s) on your network and streamline the process of performing these routine tasks. It will also monitor the HP website for any updates to the software or firmware related to the HP Media Vault and alert you when you need to update the software. The system tray utility will also alert you if any abnormal conditions that may be developing on your HP Media Vault.
The on-line user manual is also linked to this screen under the Help & Support tab.
A new installation CD and PC Restore CD that fixes Vista incompatibilities and a few other bugs was released on Feb 22, 2007. The Version 2 Installation CD and Version 2 PC Restore CD ISO images are now available on hp.com. Just search for 'media vault software' and go the the link that is described as 'Software and Driver downloads for the HP Media Vault'. You can select any Windows OS since the CDs are the same for 2K, XP, and Vista. You will find version 2 of both CD ISO images for downloading (approximately 80 MB for the Install CD and 180MB for the PC restore CD). You can download them and burn a new CDs. You can also order the physical CDs for no charge from the same location on HP's website. To distinguish these disks from the originals, along with calling each of having them 'Version 2' in the text area, HP changed the background colors of the CDs from Blue (PC Restore CD) and Green (Install CD) to Black (Version 2 PC Restore CD) and Orange (Version 2 Install CD).
To determine which version of NTI Backup Software you have installed, you can go to the directory C:\Program Files\NewTech Infosystems. Under the NTI DriveBackup! 4 folder, you should place the mouse pointer over the file called CDDIB32.exe and it will give you the file details. It should be at version 4.7.0.6. Similarly, you can navigate to the NTI Shadow 3 folder and check the file called Shadow.exe. It should be at version 3.7.2.12. If your software is not up to the latest version, it is highly recommended you either download Version 2 CD images or order the Version 2 CDs from HP.
The Generation 2 products included a control center that is different in appearance to the Generation 1 products and is shown below. In addition, the versions of the NTI software have been updated, Shadow.exe is at version 3.8.2.59 and Drive Backup 4 (CDDIB32.EXE) is at version 4.8.35.0. Please note, on the Generation 2 products, NTI Drive Backup only shipped with the Media Vault Pro units (mv5140 and mv5150).
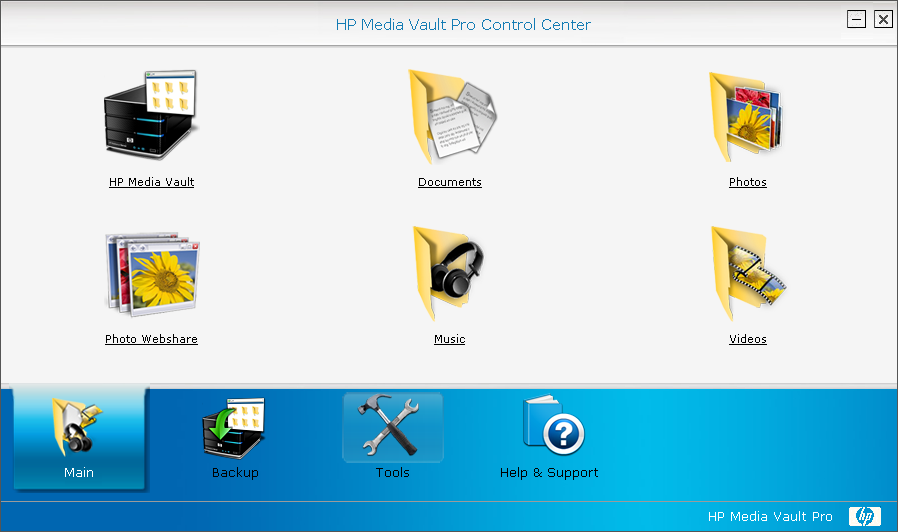
Control Center appearance of Generation2 Media Vault products (mv2120, mv5140, and mv5150)
You can download all the files to create an installation CD for the MV1 or MV2 (80 MB zip file) here.This section applies to the MV1 only. If you intend to add some new software to the Media Vault and want it to startup automatically, the Media Vault looks for a startup script file called startup.sh in the /shares/Volume1 directory and will execute it on startup. It's important that this file be created with a text editor that can save it in Unix format text and not in DOS format. The difference is that Unix text files use a single character at the end of the line (EOL) called a linefeed <lf> which is represented by a 0A hex. A DOS formatted text file uses two EOL characters, a carriage return <cr> represented with a 0D hex, followed by the <lf> 0A hex. The easiest free editor that I've found that allows you to select between these two text formats is Notepad++ which you can download and install for free. If you know 'vi', there's also very nice Windows version of it called Vim that has the same feature, although it's a bit hidden.
Since you cannot access /shares/Volume1 on your Windows system, I would recommend you store the file in an accessible folder such as /shares/Volume1/FileShare and then telnet into the Media Vault and copy it to /shares/Volume1 with this command:
cp /shares/Volume1/FileShare/startup.sh /shares/Volume1/startup.sh
Since this is not very convenient, I've proposed that this file call another startup script in a location that can be mounted on the Media Vault. I've described that proposal here.
Script files need to start with this line:
#!/bin/sh
If you manage to screw something up so that the Media Vault becomes unresponsive after installing new software, you can use a hard reset to erase startup.sh.
The MV2 also allows hacking, but allows you to write directly to the root filesystem, which can be dangerous.
If you're a Linux enthusiast, you can gain access to the root prompt on the Media Vault (MV1 only, see end of section for SSH access on MV2). If you're on a Windows PC, I'd recommend putty.exe as a terminal emulator for logging in via telnet. Telnet on the HP Media Vault is disabled by default, but you can enable it temporarily by accessing an unlinked web page on the media vault. To do that, type this into your browser address bar:
http://hpmediavault/image/hptelnet.asp
Please note, that URL will be different if you changed the default name of your HP Media Vault to something other than 'hpmediavault', so modify it accordingly. It will load a nearly blank page with button you can click in the upper left hand corner of the webpage. The button will say 'enable telnet' and you will need to click on it to get the telnet daemon to start running. After clicking on that button, you should get a screen that tells you 'telnet enabled'. Once you do that, you can log in, but be careful, because if you don't know what you're doing, you can wipe out the OS, which resides partly in the flash memory, and partly on the hard drive. Telnet will be disabled if you power cycle your HP Media Vault, or you can turn it off via the command line with the command 'killall utelnetd'.
Putty is just an executable, so you don't need to install it, you can just click on it after you've stored it on your PC, for example, on the PC's Desktop. When you do that, it will launch a window like this one:
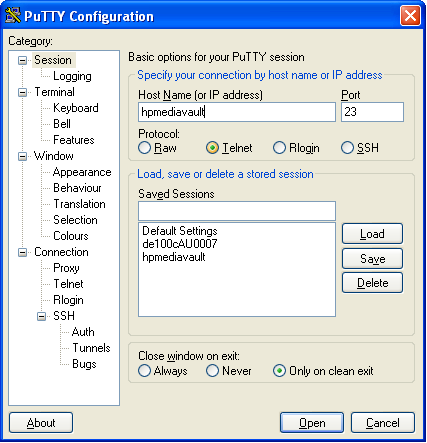
To access the hpmediavault, you can just type in its name in the Host Name box (hpmediavault is the default name unless you've changed it) or you can type in its IP address. Make sure telnet is selected on the radio button, then click on 'Open'.
That will launch a window like the one you see below:
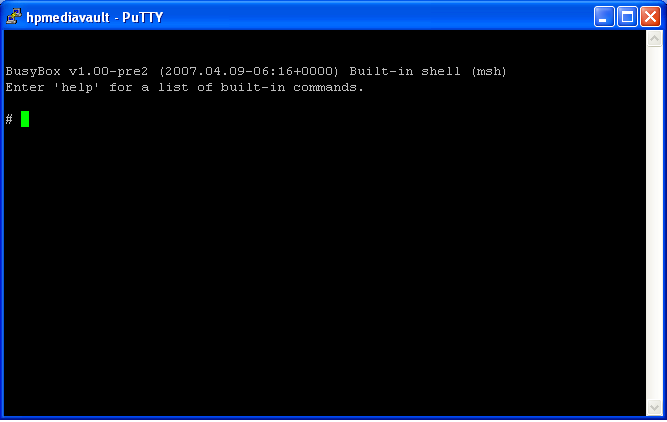
From here you can use the standard Linux commands. Here are some useful ones:
| cat - list file | ls - list directory | mv - move (or rename) a file | reboot - restart the media vault |
| cd - change directory | mkdir - make a new directory | ps - process status | rm - delete a file |
| cp - copy file | more - list file with pause between screens | pwd - print working directory | top - a process monitor; 'q' to exit top |
The Media Vault doesn't have a full set of Linux commands like a standard distribution so if you type in a command that works on other distributions but doesn't on the Media Vault, don't be too surprised. Most of the commands run through Busybox, a lightweight command interpreter for embedded systems and not all of them are enabled..
If you're on a secure network and wish to leave telnet enabled permanently, type these commands which will permanently enable telnet and commit the change to flash memory:
nvram set telnet_support=enabled
nvram commit
From then on, unless you perform a hard reset or set the nvram variable telnet_support to 'disabled', telnet will always be running.
 On the Generation 2 Media Vaults, SSH
is already installed. SSH is more secure than telnet and is also supported in putty.exe. Just set up an admin name and password and then
reboot the system you'll be able
to use SSH to log into the MV2 with user 'root' and the password you set for the
admin. Please note, after setting or resetting the admin password,
YOU MUST REBOOT the device using either the web interface (restart
under the System tab), or from the power button before it will let you login
with SSH.
On the Generation 2 Media Vaults, SSH
is already installed. SSH is more secure than telnet and is also supported in putty.exe. Just set up an admin name and password and then
reboot the system you'll be able
to use SSH to log into the MV2 with user 'root' and the password you set for the
admin. Please note, after setting or resetting the admin password,
YOU MUST REBOOT the device using either the web interface (restart
under the System tab), or from the power button before it will let you login
with SSH.
Time Machine, Configuring Mac OS X with the Media Vault
(Thanks to Bilbo Baggins)
How to Setup Time Machine on your HP Media Vault:
Please note that since Apple introduced Lion, this procedure requires you to install Netatalk, an AFP emulator for Linux. So far it has only been shown to work on the MV2. You can find the procedures to install Netatalk here.
Before you start:
- You need to know your computers name and the MAC address for the Ethernet port (even if you are using Airport wireless)
- Make sure the name of your Mac computer is a 1-word name. No spaces. This is changed in the Sharing system preferences.
- Get the MAC address of your Ethernet port from the Network system preferences. Again, this is different than the MAC address of your airport wireless card.
- You will need to use the command line in Terminal. I tried doing it with Disk Utility with no success.
Steps:
- Open Terminal (Applications > Utilities > Terminal)
- Type in (one line, copy & paste, then press enter):
defaults write com.apple.systempreferences TMShowUnsupportedNetworkVolumes 1
- Type in (one line, copy & paste, replace $SIZEg, $MACHINENAME, $MACADDRESS with your own info. See #4 for more explanation. Then press enter):
hdiutil create -size $SIZEg -fs HFS+J -type SPARSEBUNDLE -layout SPUD -volname "$NameofBackup" $MACHINENAME_$MACADDRESS.sparsebundle
- $SIZEg is the max size of your backup file in Gigabytes. You want this to be larger than your Macs Hard drive. Example: 250 gigabytes would be 250g. Dont forget to include the g. $NameofBackup is an arbitrary name you assign to the name of your backup. $MACHINENAME is the name of your mac. $MACADDRESS is the MAC address of your macs Ethernet port, but without the colons. Example: if your MAC address is 00:AA:BB:CC:DD, it becomes 00AABBCCDD. Example of what I used:
hdiutil create -size 250g -fs HFS+J -type SPARSEBUNDLE -layout SPUD -volname "MacBackup" Mac_00aabbccdd.sparsebundle
- A file with the name $MACHINENAME_$MACADDRESS.sparsebundle will be created in your home directory. Copy this file to where you want the back up to be stored on your HP Media Vault.
- Set up Time Machine. It should see the file on the HP Media Vault.
- Done.
This section applies to the MV1. On occasion, there have been reports of a volume showing up in the Disk Settings as 'unmounted'. This generally indicates that there is something corrupted on the super block or volume descriptor block for that Volume. This could occur if you have a power failure during a volume resizing operation. If the volume is a basic volume and not spanned to multiple disks or if it's a half of a mirrored volume, it's sometimes possible to mount the volume manually using telnet commands and recover its data.
Each drive has a location on the Media Vault in the /dev/scsi directory. Here is where the system drive, mobile rack drive, and USB drives can be found:
- Internal Drive: /dev/scsi/host1/bus0/target0/lun0
- Mobile Rack Drive: /dev/scsi/host2/bus0/target0/lun0
- 1st USB Drive: /dev/scsi/host5/bus0/target0/lun0
- 2nd USB Drive: /dev/scsi/host7/bus0/target0/lun0
If you look at the internal drive contents with this command:
ls /dev/scsi/host1/bus0/target0/lun0
You should see disc, part1, part2, part3 and part63
These are the partitions on that drive. Part1 and part2 are contain the operating system, part3 contains Volume1, and
part63 is the swap space. If you've added a mobile rack drive, you should see
part1, and part63 if you perform the same command on that drive. As you add more volumes, you'll see more partitions
between part1 and part63 because each volume represents a partition.
Here is an example of how you may make a mount point directory to mount a
data partition on to the FileShare folder in Volume1/disk2 using telnet if you
found that the first volume on the mobile rack drive would not mount:
cd /shares/Volume1/FileShare
mkdir disk2
mount /dev/scsi/host2/bus0/target0/lun0/part1 disk2
In this case, it would take the data partition of the mobile rack drive and mount it files into the folder FileShare/disk2. If it works, you can find the files in that folder. Copy the files off the Media Vault and on to the PC. After it completes, then you should reboot the Media Vault. Do not perform any other operations than a data recovery when a partition is mounted to FileShare. Then you can delete the corrupted volume and create a new one.
Here are the commands you'd use if you had two System drives in the same Media Vault and you were attempting to recover data from one in the mobile rack partition that had an unmountable Volume1:
cd /shares/Volume1/FileShare
mkdir disk2
mount /dev/scsi/host2/bus0/target0/lun0/part3 disk2
You do need Volume1 to automount properly to perform these commands. If your Media Vault cannot successfully automount Volume1, it is recommended you get a new internal system drive from HP, or create one yourself with Nasload from a blank drive as explained in the 'hard drive replacement' section of this FAQ. Then you can follow the procedures to manually mount the corresponding volume from the drive installed in the mobile rack location.
It almost goes without saying that if you're in this situation and don't know what you're doing, please make sure to get some help from a person who knows how to operate Linux from a command line.
USB Drives, copying files to or from
This section applies to the MV1. There are several common questions related to USB drives and how best to move files from a USB drive to a Media Vault or vice versa. The questions generally are related to whether it is better to connect the USB drive to the PC or directly to the Media Vault. The answer depends on what you're trying to accomplish.
If you already have files on the USB drive that were put on it by a PC, then the drive will either be in FAT32 or NTFS format. The Media Vault can read and write FAT32 formatted drives, but it can only read from NTFS formatted drives. NTFS is the more modern and commonly used file system on Windows PCs. You can connect a Windows-formatted drive directly to the Media Vault, and it will be automatically mounted and when you go to the 'Disk Settings' menu, you'll see a new Disk and Volume called either NTFS or FAT32. You can mount the USB drive and its contents as a drive letter to any PC. In this configuration, you can use Windows to copy files from the USB disk to the internal drive(s) in the Media Vault but it will be slow because it needs to move the files from the USB drive, over the network to the PC, and then back to the Media Vault, making two trips over the network because Windows sees these locations as essentially two different drive letters and does not know they are mounted to the same system. If you wanted to move the files without moving the data twice over the network it is possible, but you would need to telnet into the Media Vault and execute a Linux copy command. This would allow you to transfer files about 4 times faster than making the round trip between the PC and the Media Vault. You should have at least some rudimentary understanding of Linux to perform a copy command. The telnet section of this FAQ has a brief list of some of the more common Linux commands.
A USB disk with a FAT32 or NTFS format will be mounted automatically under the /foreign_shares directory. If you wish to copy the entire contents of the USB drive to MediaShare, you can use the 'cp' command. You should first use the 'ls' command, which a listing of the directory, to make sure all the files are where you think they should be. Then to copy the files, the command would look like this:
cp -R /foreign_shares/* /shares/Volume1/MediaShare
After you've completed this, you should use the 'chmod' command to fix the permissions on the files or you may be informed that the files are 'read only':
chmod -R 777 /shares/Volume1/MediaShare/
These commands can be modified as desired to change the locations of the directories you wish to copy. The cp command can also be used to copy files to the USB drive, provided it's formatted as FAT32 or with the native format of the Media Vault.
If you want to use NTFS-formatted USB drive and need to be able to read AND write to it, then you should leave it attached to a Windows PC. You can still move files to and from that drive and the Media Vault using the Windows Explorer drag-and-drop method, and the data only has to make one trip over the network, so it doesn't have the performance penalty of having to make two trips over the network.
You should always use the 'Safely Remove Disk' when you want to disconnect the USB drive from the MediaVault. Also, even though it is allowed, it's not a good idea to use the mirroring feature to mirror data on to a USB drive because it can't be safely removed from the Media Vault once you've done that. It's also too easy to disconnect its USB cable or power supply while the Media Vault is running, and this requires that the mirror be rebuilt which can take many hours.
There is an 2600+ member Media Vault user group at Yahoo set up specifically to discuss the HP Media Vault and share information with other users. You can join the group and ask questions or search its archive of more than 6500 messages if you want to learn more about the HP Media Vault or can't find the answer to your question in this FAQ. For hacking purposes, there is another group called Hacking the HP Mediavault.
This section is written about the MV1. There are two ways to set up passwords on the HP Media Vault. The easiest way is to set up a single password for each upper level Shared Folder in Workgroup mode. A more complicated, but more flexible way is to set up users and assign privileges to each user with respect to each share, such as Read, Read/Write, or none. Setting up users requires a lot more work for the Administrator and so if you can achieve what you need with Workgroup mode, that would be much easier. You can switch from Workgroup mode to User mode at any time, but when you switch out of User mode, the user list is lost and would need to be re-created if you switch back again.
If you are ever prompted for a User Name while operating in Workgroup mode, use the name of the password-protected Shared Folder you wish to access.
When you switch from Workgroup mode to User Mode, you may notice you have
trouble accessing files on the Media Vault with error messages about not having
privileges despite giving the correct user name and password. Windows only
allows one set of credentials, i.e., user name/password, to connect to a network
resource per PC so your problem may be related to the caching of network
connections on the PC. When you change your Media Vault to User mode, your PC
may still be connected in Workgroup Mode and so it violates that restriction.
You can go into a DOS window and perform the command 'net use' to see what
network connections the PC has in its cache. If you see the hpmediavault in the
list, you can disconnect from it using the following command:
net use \\hpmediavault\FileShare /delete
That is just an example, your names may be different if you've changed the name
of the Media Vault or have different Shared Folder(s) connected.
In User mode, you'll find that you can only connect as one user per PC, although
a work around is possible if you substitute the IP address instead of the
network name of your Media Vault. That would allow two connections from a single
PC with different credentials.
This section applies to the MV1. There were a number of issues related to Vista that have been fixed with new software and firmware. Most of the issues were related to the Installation CD and PC Restore CD so you will need a new Install CD and PC Restore CDs (version 2) as explained in the Software Utilities section.
There is also a new firmware release (version 1.3.5.9) that addresses issues with Vista primarily related to passwords protected shares and printer sharing. It can be found in the firmware section. Even with the newest firmware there is still a bug with using Workgroup share mode with Vista where you can't reliably connect to a password-protected share in that mode. If you need to password protect shares and access them with Vista, you should change the Media Vault to User Mode.
There have been problems with moving large files from the Media Vault to Vista that have been corrected in firmware version 1.3.5.9.
The backup function built into Vista will not communicate with shares that are not password protected. If you want to use it, you'll have to put your Media Vault in User mode since passwords don't work properly with Vista in Workgroup mode.
Some have reported problems in running programs on a Vista machine directly from the Media Vault, noting that the programs had to be copied to a local drive before they would run. You may need to change some of Vista's User Account Control (UAC) settings to run programs directly from a network device. The procedure is covered here. Another option, if your Media Vault is set up in user mode, is to add a user with username 'guest' and password 'guest' without privileges to access any files. Then you should be able to keep UAC enabled on the Vista system and execute files directly from the Media Vault.
This section applies to the MV1. Web Browsing Mode allows you to navigate through the Shared Folders that are enabled for Web Browser access using a standard web browser like Internet Explorer or Firefox. You may not need this access mode on your local network where you can use Windows Explorer to navigate the file system but it's particularly useful for remote access.
Web browsing mode uses frames. The left frame is for navigating. In Read-Only Mode, the right frame shows more details about the files, like file size and date modified. Although the right frame has links to the folders and files, it's never necessary to click on them when you're in Read-Only Mode. In fact, it's best to avoid clicking on anything in the right frame. If you do, you'll find that your left frame goes away and the navigation becomes more difficult. You should do your navigation from the left frame. You can also select individual files from there too. You should think of the right frame simply as a way to view the sizes and date stamps of the individual files. There is a bug where if you begin navigating in the right half pane, and attempt to select a file, it will select the last file in the list instead of the one that you click on, so stay out of that pane and do all your navigating and file selections from the left hand pane.
When Full access mode is enabled for Web Browser access, the right frame no longer shows file details, but instead offers a method to upload files and create new folders when navigating from the left frame. If you click in folder in the right frame at the top level, or if you upload files or create folders, the left frame will disappear, and you'll notice that new buttons are available to allow you to delete or rename files in that folder. To get the left navigation frame back, you may need to use the 'back' function of your browser a few times.
The HP Media Vault was offered on-line at HPShopping.com The last known price U.S. MSRP pricing was $249 for the mv2010 (300GB) and $399 for the mv2020 (500GB). The only place you'd find one now would be on a site like Ebay. I would recommend at this point you'd purchase something newer with better security and technical support..
Microsoft disabled SMB 1.0/CIFS File Sharing on Windows 10 in 2017 and to access an HP MediaVault, you have to re-enable it because the MediaVault doesn't support SMBv2. The easiest way to do this is to type "Turn Windows Features on or off" in the Search bar in Windows and you'll see a utility of that name. Click on it and scroll down in that utility and check the box to re-enabled SMBv1 client mode. It may require Windows to reboot to make it active. After that you will be able to see and access files on your network that are on your HP MediaVault.
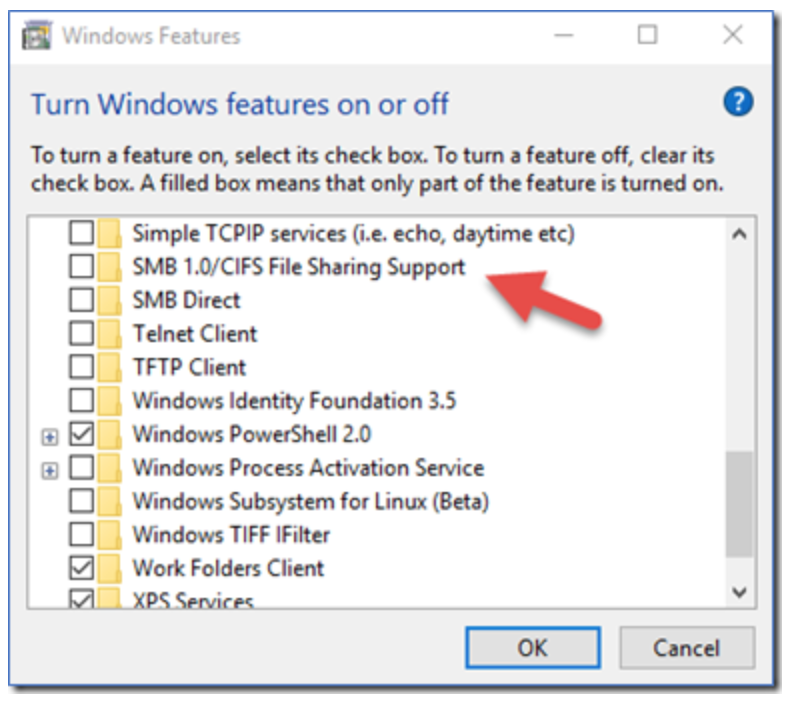
Windows Media Player 11 issues
Windows Media Player 11 absorbed the functionality of Windows Media Connect, Microsoft's previous DLNA server software. As a result, WMC is no longer available and so if you want the WMC functionality, you have to install WMP11. However, they also made some changes that make it more difficult to stream files from a network drive (like the HP Media Vault). If you want to do that, you need to put the HP Media Vault in WMP11's list of 'monitored folders' and also enable a registry variable as explained in this Microsoft FAQ:
http://www.microsoft.com/windows/windowsmedia/player/faq/sharing.mspx
Here are the two areas in that FAQ that answer those questions:
Q. What are monitored folders?
Q. Why can't I play files that are shared by one computer but located on different computer?
The Sony PlayStation 3 gaming console has added DLNA media streaming capability with version 1.9 of the PS3 firmware. Some have reported it to work with the HP Media Vault's built in DLNA server in the MV1 but other reports have found reliability issues with it. The Xbox 360 server based has some incompatibilities with the DLNA standard so it does not work with the HP Media Vault's (MV1) built-in DLNA server. You can make it work by using a PC to stream files from the Media Vault to the Xbox 360 or install the Twonky server.
It's possible to install version 4.4 of Twonkymedia's server on the Media Vault (MV1) and get the MV1 to work with the Xbox 360. Twonky's server is factory-installed on the MV2 series so it will work with either the PS3 or the Xbox 360, but you will have to download some free software from Xbox Live to allow it to play Divx/mp4 videos. There have been some reports of difficulties with both of these game consoles with certain file formats so be aware that they may not work with all file formats.
Gaming consoles are typically sold at a loss and so their manufacturers must depend on game royalties to make money. They have a vested interest in seeing to it that that's how you use the game console, i.e., buying games, growing tired of the playing the games, and then buying more games. When you play music or videos on your game console, you are not using it to play games, and this may help explain why they seem to have expended minimal effort in making the media streaming features reliable and easy to use. In marketing parlance, media streaming on a game console is considered to be a 'check box item', and is done primarily to remain competitive with other game consoles.